VSeeFace
About
VSeeFace is a free, highly configurable face and hand tracking VRM and VSFAvatar avatar puppeteering program for virtual youtubers with a focus on robust tracking and high image quality. VSeeFace offers functionality similar to Luppet, 3tene, Wakaru and similar programs. VSeeFace runs on Windows 8 and above (64 bit only). Perfect sync is supported through iFacialMocap/FaceMotion3D/VTube Studio/MeowFace. VSeeFace can send, receive and combine tracking data using the VMC protocol, which also allows support for tracking through Virtual Motion Capture, Tracking World, Waidayo and more. Capturing with native transparency is supported through OBS’s game capture, Spout2 and a virtual camera.
Face tracking, including eye gaze, blink, eyebrow and mouth tracking, is done through a regular webcam. For the optional hand tracking, a Leap Motion device is required. You can see a comparison of the face tracking performance compared to other popular vtuber applications here. In this comparison, VSeeFace is still listed under its former name OpenSeeFaceDemo.
Running four face tracking programs (OpenSeeFaceDemo, Luppet, Wakaru, Hitogata) at once with the same camera input. 😊 pic.twitter.com/ioO2pofpMx
— Emiliana (@emiliana_vt) June 23, 2020
If you have any questions or suggestions, please first check the FAQ. If that doesn’t help, feel free to contact me, @Emiliana_vt!
Please note that Live2D models are not supported. For those, please check out VTube Studio or PrprLive.
Download
To update VSeeFace, just delete the old folder or overwrite it when unpacking the new version.
VSeeFace only supports the VRM0 standard, not VRM 1.0. Make sure to select the VRM0 export format when exporting models from VRoid Studio or other applications.
VSeeFace v1.13.38c4 contains a patch for the recent Unity security vulnerability, so updating is recommended.
Old versions can be found in the release archive here. This website, the #vseeface-updates channel on Deat’s discord and the release archive are the only official download locations for VSeeFace.
I post news about new versions and the development process on Twitter with the #VSeeFace hashtag. Feel free to also use this hashtag for anything VSeeFace related. Starting with 1.13.26, VSeeFace will also check for updates and display a green message in the upper left corner when a new version is available, so please make sure to update if you are still on an older version.
The latest release notes can be found here. Some tutorial videos can be found in this section.
VSeeFaceはVTuber向けのフェーストラッキングソフトです。Webカメラで簡単にVRMアバターを動かすことができます。Leap Motionによる手と指のトラッキング機能もあります。iFacialMocap/FaceMotion3Dによるパーフェクトシンクも対応です。VMCプロトコルも対応です(Waidayo、iFacialMocap2VMC)。ダウンロードはこちら。リリースノートはこちら。まだベータ版です。
VRM以外UnityのAssetBundle形式のVSFAvatarも使えます。SDKはこちら。VSFAvatar形式のモデルでカスタムシェーダーやDynamic Bonesやコンストレイントなどを使用が出来ます。
@Virtual_Deatさんのディスコードサーバーに入るとルールズチャンネルで👌にクリックでルールを同意して他のチャンネルも表示されます。#vseefaceと日本語チャンネルもあります。
VSeeFaceはクロマキーで録画が出来ないけどOBSのGame CaptureでAllow transparencyをチェックしてVSeeFaceで右下の※ボタンでUIを見えないにすれば綺麗な透明の背景になります。
UIの日本語訳があり、日本語のチュートリアル動画もあります。最初の画面で日本語を選択が出来ます。
ライセンス:営利・非営利問わずご自由にお使いください。
Terms of use
You can use VSeeFace to stream or do pretty much anything you like, including non-commercial and commercial uses. Just don’t modify it (other than the translation json files) or claim you made it.
VSeeFace is beta software. There may be bugs and new versions may change things around. It is offered without any kind of warrenty, so use it at your own risk. It should generally work fine, but it may be a good idea to keep the previous version around when updating.
ライセンス:営利・非営利問わずご自由にお使いください。
Extending functionality
While modifying the files of VSeeFace itself is not allowed, injecting DLLs for the purpose of adding or modifying functionality (e.g. using a framework like BepInEx) to VSeeFace is allowed. Analyzing the code of VSeeFace (e.g. with ILSpy) or referring to provided data (e.g. VSF SDK components and comment strings in translation files) to aid in developing such mods is also allowed. Mods are not allowed to modify the display of any credits information or version information.
Please refrain from commercial distribution of mods and keep them freely available if you develop and distribute them. Also, please avoid distributing mods that exhibit strongly unexpected behaviour for users.
Disclaimer
THIS SOFTWARE IS PROVIDED BY THE COPYRIGHT HOLDERS AND CONTRIBUTORS “AS IS” AND ANY EXPRESS OR IMPLIED WARRANTIES, INCLUDING, BUT NOT LIMITED TO, THE IMPLIED WARRANTIES OF MERCHANTABILITY AND FITNESS FOR A PARTICULAR PURPOSE ARE DISCLAIMED. IN NO EVENT SHALL THE COPYRIGHT HOLDER OR CONTRIBUTORS BE LIABLE FOR ANY DIRECT, INDIRECT, INCIDENTAL, SPECIAL, EXEMPLARY, OR CONSEQUENTIAL DAMAGES (INCLUDING, BUT NOT LIMITED TO, PROCUREMENT OF SUBSTITUTE GOODS OR SERVICES; LOSS OF USE, DATA, OR PROFITS; OR BUSINESS INTERRUPTION) HOWEVER CAUSED AND ON ANY THEORY OF LIABILITY, WHETHER IN CONTRACT, STRICT LIABILITY, OR TORT (INCLUDING NEGLIGENCE OR OTHERWISE) ARISING IN ANY WAY OUT OF THE USE OF THIS SOFTWARE, EVEN IF ADVISED OF THE POSSIBILITY OF SUCH DAMAGE.
Credits
VSeeFace is being created by @Emiliana_vt and @Virtual_Deat.
VSFAvatar
Starting with VSeeFace v1.13.36, a new Unity asset bundle and VRM based avatar format called VSFAvatar is supported by VSeeFace. This format allows various Unity functionality such as custom animations, shaders and various other components like dynamic bones, constraints and even window captures to be added to VRM models. This is done by re-importing the VRM into Unity and adding and changing various things. To learn more about it, you can watch this tutorial by @Virtual_Deat, who worked hard to bring this new feature about!
A README file with various important information is included in the SDK, but you can also read it here. The README file also contains informations on compatible versions for Unity and UniVRM as well as supported versions of other components, so make sure to refer to it if you need any of this information.
SDK download: v1.13.38c (release archive)
日本語の情報が@narou_rielさんのメモサイトにはあります。
Make sure to set the Unity project to linear color space.
You can watch how the two included sample models were set up here.
Tutorials
There are a lot of tutorial videos out there. This section lists a few to help you get started, but it is by no means comprehensive. Make sure to look around!
Official tutorials
- Tutorial: How to set up expression detection in VSeeFace @ Emiliana
- The New VSFAvatar Format: Custom shaders, animations and more @ Virtual_Deat
VSeeFace tutorials
- Ultimate Guide to VSeeFace @ Kana Fuyuko
- VSeeFace is pretty pog @ Killakuma
- Ultimate Guide to VSeeFace Part 2 @ Kana Fuyuko
- How to use VSeeFace @ Raelice
- Precision face tracking from iFacialMocap to VSeeFace @ Suvidriel
- HANA_Tool/iPhone tracking - Tutorial Add 52 Keyshapes to your Vroid @ Argama Witch
- Setting Up Real Time Facial Tracking in VSeeFace @ Fofamit
- iPhone Face ID tracking with Waidayo and VSeeFace @ Fofamit
- Full body motion from ThreeDPoseTracker to VSeeFace @ Suvidriel
- VR Tracking from VMC to VSeeFace @ Suvidriel
- Hand Tracking / Leap Motion Controller VSeeFace Tutorial @ AMIRITE GAMING
- VTuber Twitch Expression & Animation Integration @ Fofamit
- How to pose your model with Unity and the VMC protocol receiver @ NiniNeen
- How To Use Waidayo, iFacialMocap, FaceMotion3D, And VTube Studio For VSeeFace To VTube With @ Kana Fuyuko
VRM model tutorials
- Springbones: How to add physics to bones @ Deat’s virtual escapades
- How to Adjust Vroid blendshapes in Unity! @ Argama Witch
- Advanced emotions for VRoid VRM models @ Suvidriel
VSFAvatar model tutorials
- VSFAvatar tutorial playlist @ Suvidriel
- How I fix Mesh Related Issues on my VRM/VSF Models @ Feline Entity
- Turning Blendshape Clips into Animator Parameters @ Feline Entity
- Proxy Bones (instant model changes, tracking-independent animations, ragdoll) @ Feline Entity
日本語のチュートリアル動画:
- VTuber向けアプリに黒船襲来!?海外勢に人気のVSeeFaceに乗り遅れるな!【How to use VSeeFace for Japanese VTubers (JPVtubers)】 @ 大福らなチャンネル
- 【Webカメラで動かす】3D VTuber 向け Unity 要らずで簡単!全身+顔+指が動くフルトラッキング環境解説【VSeeFace+TDPT+waidayo】 @ ひのちゃんねる/hinochannel
- Webカメラ2台で顔も身体もトラッキング!解説動画 @ あこゆかプロジェクト
- VSeeFace Spout2で画面をエクスポートって何?メニューをOBSに映さない方法 @ 出口貞夫 / Deguchi Sadao
- VSFAvatar形式で3Dルーム、デスクトップキャプチャ、カメラ切り替え @ 金曜日びすたん
- 【VSeeFaceSDK】VSeeFaceでリアルタイムエフェクト動かしたい @ 金曜日びすたん
- 個人Vtuberでも豪華フルトラ配信ができる?!解説講座動画 (mocopi) @ 出口貞夫 / Deguchi Sadao
Manual
This section is still a work in progress. For help with common issues, please refer to the troubleshooting section.
The most important information can be found by reading through the help screen as well as the usage notes inside the program.
FAQ
How can I move my character?
You can rotate, zoom and move the camera by holding the Alt key and using the different mouse buttons. The exact controls are given on the help screen.
Once you’ve found a camera position you like and would like for it to be the initial camera position, you can set the default camera setting in the General settings to Custom. You can now move the camera into the desired position and press Save next to it, to save a custom camera position. Please note that these custom camera positions to not adapt to avatar size, while the regular default positions do.
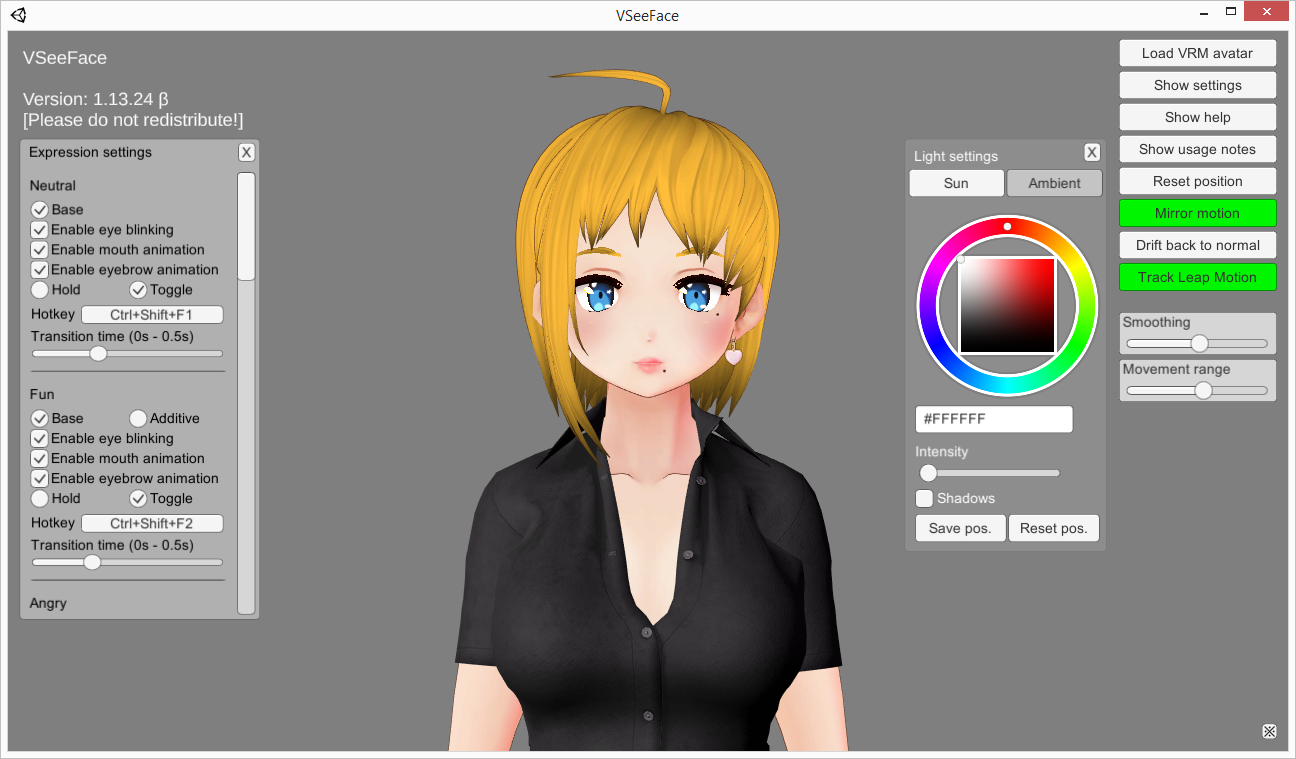
How can I change the direction of the lighting?
You can adjust the lighting by holding the Ctrl key and dragging the mouse while left clicking. Pressing D will reset it. The currently set light position can be saved in the Light settings window.
I just exported my model from VRoid Studio, but VSeeFace won’t load it?
VSeeFace only supports the VRM0 standard, not VRM 1.0. Make sure to select the VRM0 export format when exporting models from VRoid Studio or other applications.
How do I do chroma keying with a gray background?
VSeeFace does not support chroma keying. Instead, capture it in OBS using a game capture and enable the Allow transparency option on it. Once you press the tiny ※ button in the lower right corner, the UI will become hidden and the background will turn transparent in OBS. You can hide and show the ※ button using the space key.
What’s the best way to set up a collab then?
You can set up the virtual camera function, load a background image and do a Discord (or similar) call using the virtual VSeeFace camera.
Can I get rid of the ※ button in the corner somehow? It shows on OBS.
You can hide and show the ※ button using the space key.
Sometimes blue bars appear at the edge of the screen, what’s up with that and how do I get rid of them?
Those bars are there to let you know that you are close to the edge of your webcam’s field of view and should stop moving that way, so you don’t lose tracking due to being out of sight. If you have set the UI to be hidden using the ※ button in the lower right corner, blue bars will still appear, but they will be invisible in OBS as long as you are using a Game Capture with Allow transparency enabled.
I’m using a model from VRoid Hub and when I press start, a white bar appears in the center of the screen and nothing happens?
For some reason, VSeeFace failed to download your model from VRoid Hub. As a workaround, you can manually download it from the VRoid Hub website and add it as a local avatar.
Does VSeeFace have gaze tracking?
Yes, unless you are using the Toaster quality level or have enabled Synthetic gaze which makes the eyes follow the head movement, similar to what Luppet does. You can try increasing the gaze strength and sensitivity to make it more visible.
Why can’t VSeeFace show the whole body of my model?
It can, you just have to move the camera. Please refer to the last slide of the Tutorial, which can be accessed from the Help screen for an overview of camera controls. It is also possible to set a custom default camera position from the general settings.
Why isn’t my custom window resolution saved when exiting VSeeFace?
Resolutions that are smaller than the default resolution of 1280x720 are not saved, because it is possible to shrink the window in such a way that it would be hard to change it back. You might be able to manually enter such a resolution in the settings.ini file.
Can I change avatars/effect settings/props without having the UI show up in OBS with a hotkey?
You can completely avoid having the UI show up in OBS, by using the Spout2 functionality. For more information, please refer to this. Effect settings can be controlled with components from the VSeeFace SDK, so if you are using a VSFAvatar model, you can create animations linked to hotkeyed blendshapes to animate and manipulate the effect settings. The local “L” hotkey will open a file opening dialog to directly open model files without going through the avatar picker UI, but loading the model can lead to lag during the loading process. Since loading models is laggy, I do not plan to add general model hotkey loading support. Instead, where possible, I would recommend using VRM material blendshapes or VSFAvatar animations to manipulate how the current model looks without having to load a new one.
Is Spout2 capture supported by Streamlabs?
Streamlabs has implemented Spout2, you can find their documentation here.
What are the requirements for a custom model to make use the gaze tracking?
If humanoid eye bones are assigned in Unity, VSeeFace will directly use these for gaze tracking. The gaze strength setting in VSeeFace determines how far the eyes will move and can be subtle, so if you are trying to determine whether your eyes are set up correctly, try turning it up all the way. You can also use the Vita model to test this, which is known to have a working eye setup. Also, see here if it does not seem to work.
To use the VRM blendshape presets for gaze tracking, make sure that no eye bones are assigned in Unity’s humanoid rig configuration. Sometimes other bones (ears or hair) get assigned as eye bones by mistake, so that is something to look out for. The synthetic gaze, which moves the eyes either according to head movement or so that they look at the camera, uses the VRMLookAtBoneApplyer or the VRMLookAtBlendShapeApplyer, depending on what exists on the model. Also see the model issues section for more information on things to look out for.
With ARKit tracking, I animating eye movements only through eye bones and using the look blendshapes only to adjust the face around the eyes. Otherwise both bone and blendshape movement may get applied.
What should I if my model freezes or starts lagging when the VSeeFace window is in the background and a game is running?
In rare cases it can be a tracking issue. If your screen is your main light source and the game is rather dark, there might not be enough light for the camera and the face tracking might freeze.
More often, the issue is caused by Windows allocating all of the GPU or CPU to the game, leaving nothing for VSeeFace. Here are some things you can try to improve the situation:
- If you are using an NVIDIA GPU, make sure you are running the latest driver and the latest version of VSeeFace. Ensure that hardware based GPU scheduling is enabled.
- Make sure you are using VSeeFace v1.13.37c or newer and run it as administrator. If you use a game capture instead of Spout2 to capture VSeeFace, you might have to run OBS as administrator as well for the game capture to work properly.
- Ensure that “Disable increased background priority” in the “General settings” is not ticked, so that the increased background priority function is enabled. This is the case by default.
If that doesn’t help, you can try the following things:
- Make sure game mode is not enabled in Windows.
- Make sure no “game booster” is enabled in your anti virus software (applies to some versions of Norton, McAfee, BullGuard and maybe others) or graphics driver.
- Try setting VSeeFace and the facetracker.exe to realtime priority in the details tab of the task manager.
- Try using the Spout2 capture option instead of a game capture
- Run VSeeFace and OBS as admin.
- Make sure VSeeFace has a framerate capped at 60fps.
- Turn off Steam overlay for the game.
- Turn on VSync for the game.
- Try setting the game to borderless/windowed fullscreen.
- Set a framerate cap for the game as well and lower graphics settings.
- Try setting the same frame rate for both VSeeFace and the game.
- In the case of multiple screens, set all to the same refresh rate.
- Turn off NVIDIA G-Sync.
- See if any of this helps: this or this
It can also help to reduce the tracking and rendering quality settings a bit if it’s just your PC in general struggling to keep up. For more information on this, please check the performance tuning section.
I’m looking straight ahead, but my eyes are looking all the way in some direction?
Make sure the gaze offset sliders are centered. They can be used to correct the gaze for avatars that don’t have centered irises, but they can also make things look quite wrong when set up incorrectly.
My eyebrows barely move?
Make sure your eyebrow offset slider is centered. It can be used to overall shift the eyebrow position, but if moved all the way, it leaves little room for them to move.
How do I adjust the Leap Motion’s position? My arms are stiff and stretched out?
First, hold the alt key and right click to zoom out until you can see the Leap Motion model in the scene. Then use the sliders to adjust the model’s position to match its location relative to yourself in the real world. You can refer to this video to see how the sliders work.
What about privacy? Is any of my data or my face transmitted online? Can my face leak into the VSeeFace window?
I took a lot of care to minimize possible privacy issues. The face tracking is done in a separate process, so the camera image can never show up in the actual VSeeFace window, because it only receives the tracking points (you can see what those look like by clicking the button at the bottom of the General settings; they are very abstract). If you are extremely worried about having a webcam attached to the PC running VSeeFace, you can use the network tracking or phone tracking functionalities. No tracking or camera data is ever transmitted anywhere online and all tracking is performed on the PC running the face tracking process.
The onnxruntime library used in the face tracking process by default includes telemetry that is sent to Microsoft, but I have recompiled it to remove this telemetry functionality, so nothing should be sent out from it. Even if it was enabled, it wouldn’t send any personal information, just generic usage data.
When starting, VSeeFace downloads one file from the VSeeFace website to check if a new version is released and display an update notification message in the upper left corner. There are no automatic updates. It shouldn’t establish any other online connections.
Depending on certain settings, VSeeFace can receive tracking data from other applications, either locally over network, but this is not a privacy issue. If the VMC protocol sender is enabled, VSeeFace will send blendshape and bone animation data to the specified IP address and port.
As for data stored on the local PC, there are a few log files to help with debugging, that will be overwritten after restarting VSeeFace twice, and the configuration files. This data can be found as described here. Screenshots made with the S or Shift+S hotkeys will be stored in a folder called VSeeFace inside your profile’s pictures folder.
The VSeeFace website does use Google Analytics, because I’m kind of curious about who comes here to download VSeeFace, but the program itself doesn’t include any analytics.
You can also check out this article about how to keep your private information private as a streamer and VTuber. It’s not complete, but it’s a good introduction with the most important points.
I moved my Leap Motion from the desk to a neck holder, changed the position to chest and now my arms are in the sky?
Changing the position also changes the height of the Leap Motion in VSeeFace, so just pull the Leap Motion position’s height slider way down. Zooming out may also help.
My Leap Motion complains that I need to update its software, but I’m already on the newest version of V2?
To fix this error, please install the V5.2 (Gemini) SDK. It says it’s used for VR, but it is also used by desktop applications.
Capturing VSeeFace through Spout2 does not work even though it was enabled?
Your system might be missing the Microsoft Visual C++ 2010 Redistributable library. After installing it from here and rebooting it should work.
Do hotkeys work even while VSeeFace is in the background?
All configurable hotkeys also work while it is in the background or minimized, so the expression hotkeys, the audio lipsync toggle hotkey and the configurable position reset hotkey all work from any other program as well. On some systems it might be necessary to run VSeeFace as admin to get this to work properly for some reason.
My VSeeFace randomly disappears?/It can no longer find the facetracker.exe file?/Why did VSeeFace delete itself off my PC?
VSeeFace never deletes itself. This is usually caused by over-eager anti-virus programs. The face tracking is written in Python and for some reason anti-virus programs seem to dislike that and sometimes decide to delete VSeeFace or parts of it. There should be a way to whitelist the folder somehow to keep this from happening if you encounter this type of issue.
The VSeeFace SDK doesn’t work (no menu showing up, export failing with an error that a file wasn’t found)?
Check the “Console” tabs. There are probably some errors marked with a red symbol. You might have to scroll a bit to find it. These are usually some kind of compiler errors caused by other assets, which prevent Unity from compiling the VSeeFace SDK scripts. One way of resolving this is to remove the offending assets from the project. Another way is to make a new Unity project with only UniVRM 0.89 and the VSeeFace SDK in it.
I’m using a custom shader in my VSFAvatar, but a transparent section turns opaque parts of my model translucent in OBS?
In cases where using a shader with transparency leads to objects becoming translucent in OBS in an incorrect manner, setting the alpha blending operation to “Max” often helps. For example, there is a setting for this in the “Rendering Options”, “Blending” section of the Poiyomi shader. In the case of a custom shader, setting BlendOp Add, Max or similar, with the important part being the Max should help.
Can I switch avatars with a hotkey?
There is the “L” hotkey, which lets you directly load a model file. In general loading models is too slow to be useful for use through hotkeys. If you want to switch outfits, I recommend adding them all to one model. With VRM this can be done by changing making meshes transparent by changing the alpha value of its material through a material blendshape. For VSFAvatar, the objects can be toggled directly using Unity animations.
Is there support for RTX tracking?
It’s not directly supported, but you can try using it via the this Expression Bridge application.
Since VSeeFace has no greenscreen option, how can I use it with Shoost?
Enable Spout2 support in the General settings of VSeeFace, enable Spout Capture in Shoost’s settings and you will be able to directly capture VSeeFace in Shoost using a Spout Capture layer. You can find screenshots of the options here.
When exporting a VSFAvatar, this error appears? Detected invalid components on avatar: "UniGLTF.RuntimeGltfInstance",
This error occurs with certain versions of UniVRM. Currently UniVRM 0.89 is supported. When installing a different version of UniVRM, make sure to first completely remove all folders of the version already in the project.
Can disabling hardware-accelerated GPU scheduling help fix performance issues?
Usually it is better left on! But in at least one case, the following setting has apparently fixed this: Windows => Graphics Settings => Change default graphics settings => Disable “Hardware-accelerated GPU scheduling”. In another case, setting VSeeFace to realtime priority seems to have helped. However, it has also reported that turning it on helps. Please see here for more information.
I uploaded my model to VSeeFace and deleted the file, now it’s gone?
There is no online service that the model gets uploaded to, so in fact no upload takes place at all and, in fact, calling uploading is not accurate. When you add a model to the avatar selection, VSeeFace simply stores the location of the file on your PC in a text file. If you move the model file, rename it or delete it, it disappears from the avatar selection because VSeeFace can no longer find a file at that specific place. Please take care and backup your precious model files.
I get an error when starting the tracking with DroidCam (or some other camera)?
Try switching the camera settings from Camera defaults to something else. The camera might be using an unsupported video format by default.
Is there a way to use an Android phone for face tracking instead of an iPhone?
You can Suvidriel’s MeowFace, which can send the tracking data to VSeeFace using VTube Studio’s protocol.
Where can I find avatars I can use?
Many people make their own using VRoid Studio or commission someone. Vita is one of the included sample characters. You can also find VRM models on VRoid Hub and Niconi Solid, just make sure to follow the terms of use.
I have a model in a different format, how do I convert it to VRM?
Follow the official guide. The important thing to note is that it is a two step process. First, you export a base VRM file, which you then import back into Unity to configure things like blend shape clips. After that, you export the final VRM. If you look around, there are probably other resources out there too.
Can I add expressions to my model?
Yes, you can do so using UniVRM and Unity. You can find a tutorial here. Once the additional VRM blend shape clips are added to the model, you can assign a hotkey in the Expression settings to trigger it. The expression detection functionality is limited to the predefined expressions, but you can also modify those in Unity and, for example, use the Joy expression slot for something else.
My model’s arms/hair/whatever looks weirdly twisted?
This is most likely caused by not properly normalizing the model during the first VRM conversion. To properly normalize the avatar during the first VRM export, make sure that Pose Freeze and Force T Pose is ticked on the ExportSettings tab of the VRM export dialog. I also recommend making sure that no jaw bone is set in Unity’s humanoid avatar configuration before the first export, since often a hair bone gets assigned by Unity as a jaw bone by mistake. If a jaw bone is set in the head section, click on it and unset it using the backspace key on your keyboard. If your model does have a jaw bone that you want to use, make sure it is correctly assigned instead.
Note that re-exporting a VRM will not work to for properly normalizing the model. Instead the original model (usually FBX) has to be exported with the correct options set.
I just exported my model from VRoid 1.0 and the hair explodes or goes crazy?
The VRM spring bone colliders seem to be set up in an odd way for some exports. You can either import the model into Unity with UniVRM and adjust the colliders there (see here for more details) or use this application to adjust them.
My model is twitching sometimes?
If you have the fixed hips option enabled in the advanced option, try turning it off. If this helps, you can try the option to disable vertical head movement for a similar effect. If it doesn’t help, try turning up the smoothing, make sure that your room is brightly lit and try different camera settings.
There’s a bright outline around my model that stands out against dark background?
First, make sure you are using the ※ button to hide the UI and use a game capture in OBS with Allow transparency ticked. Color or chroma key filters are not necessary. If the issue persists, try right clicking the game capture in OBS and select Scale Filtering, then Bilinear.
My VSFAvatar has bright pixels around it even with the UI hidden?
Make sure to use a recent version of UniVRM (0.89). With VSFAvatar, the shader version from your project is included in the model file. Older versions of MToon had some issues with transparency, which are fixed in recent versions.
I converted my model to VRM format, but when I blink, my mouth moves or I activate an expressions, it looks weird and the shadows shift?
Make sure to set “Blendshape Normals” to “None” or enable “Legacy Blendshape Normals” on the FBX when you import it into Unity and before you export your VRM. That should prevent this issue.
How can I get my eyebrows to work on a custom model?
You can add two custom VRM blend shape clips called “Brows up” and “Brows down” and they will be used for the eyebrow tracking. You can also add them on VRoid and Cecil Henshin models to customize how the eyebrow tracking looks. Also refer to the special blendshapes section.
When will VSeeFace support webcam based hand tracking (through MediaPipe or KalidoKit)?
Probably not anytime soon. In my experience, the current webcam based hand tracking don’t work well enough to warrant spending the time to integrate them. I have written more about this here. If you require webcam based hand tracking, you can try using something like this to send the tracking data to VSeeFace, although I personally haven’t tested it yet. RiBLA Broadcast (β) is a nice standalone software which also supports MediaPipe hand tracking and is free and available for both Windows and Mac.
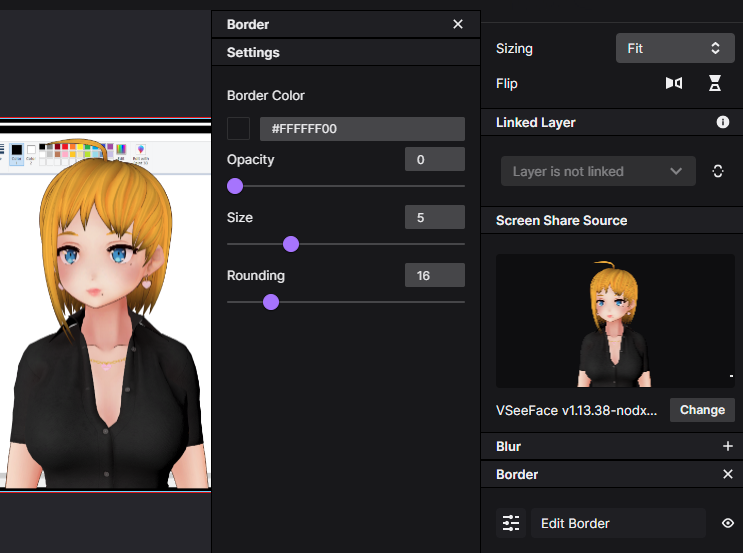
How can I capture VSeeFace with transparency in Twitch Studio?
Add VSeeFace as a regular screen capture and then add a transparent border like shown here. The background should now be transparent. I would still recommend using OBS, as that is the main supported software and allows using e.g. Spout2 through a plugin.
Can I use custom scripts with VSFAvatar format?
No, and it’s not just because of the component whitelist. VSFAvatar is based on Unity asset bundles, which cannot contain code. If you export a model with a custom script on it, the script will not be inside the file. Only a reference to the script in the form “there is script 7feb5bfa-9c94-4603-9bff-dde52bd3f885 on the model with ‘speed’ set to 0.5” will actually reach VSeeFace. Since VSeeFace was not compiled with script 7feb5bfa-9c94-4603-9bff-dde52bd3f885 present, it will just produce a cryptic error. The explicit check for allowed components exists to prevent weird errors caused by such situations.
I want to run VSeeFace on another PC and use a capture card to capture it, is that possible?
I would recommend running VSeeFace on the PC that does the capturing, so it can be captured with proper transparency. The actual face tracking could be offloaded using the network tracking functionality to reduce CPU usage. If this is really not an option, please refer to the release notes of v1.13.34o. The settings.ini can be found as described here.
Where does VSeeFace put screenshots?
The screenshots are saved to a folder called VSeeFace inside your Pictures folder. You can make a screenshot by pressing S or a delayed screenshot by pressing shift+S.
I converted my model to VRM format, but the mouth doesn’t move and the eyes don’t blink?
VRM conversion is a two step process. After the first export, you have to put the VRM file back into your Unity project to actually set up the VRM blend shape clips and other things. You can follow the guide on the VRM website, which is very detailed with many screenshots.
Why does Windows give me a warning that the publisher is unknown?
Because I don’t want to pay a high yearly fee for a code signing certificate.
I have an N edition Windows and when I start VSeeFace, it just shows a big error message that the tracker is gone right away.
N versions of Windows are missing some multimedia features. First make sure your Windows is updated and then install the media feature pack.
How do I install a zip file?
Right click it, select Extract All... and press next. You should have a new folder called VSeeFace. Inside there should be a file called VSeeFace with a blue icon, like the logo on this site. Double click on that to run VSeeFace. There’s a video here.
If Windows 10 won’t run the file and complains that the file may be a threat because it is not signed, you can try the following: Right click it -> Properties -> Unblock -> Apply or select exe file -> Select More Info -> Run Anyways
When loading my model, I get an error saying something about a NotVrm0Exception, what’s up with that?
VSeeFace does not support VRM 1.0 models. Make sure to export your model as VRM0X. Please refer to the VSeeFace SDK README for the currently recommended version of UniVRM.
Sometimes, when leaving the PC, my model suddenly moves away and starts acting strange.
Make sure that you don’t have anything in the background that looks like a face (posters, people, TV, etc.). Sometimes even things that are not very face-like at all might get picked up. A good way to check is to run the run.bat from VSeeFace_Data\StreamingAssets\Binary. It will show you the camera image with tracking points. If green tracking points show up somewhere on the background while you are not in the view of the camera, that might be the cause. Just make sure to close VSeeFace and any other programs that might be accessing the camera first.
What are the minimum system requirements to run VSeeFace?
I really don’t know, it’s not like I have a lot of PCs with various specs to test on. You need to have a DirectX compatible GPU, a 64 bit CPU and a way to run Windows programs. Beyond that, just give it a try and see how it runs. Face tracking can be pretty resource intensive, so if you want to run a game and stream at the same time, you may need a somewhat beefier PC for that. There is some performance tuning advice at the bottom of this page.
Does VSeeFace run on 32 bit CPUs?
No.
Does VSeeFace run on Mac?
No. Although, if you are very experienced with Linux and wine as well, you can try following these instructions for running it on Linux. A tutorial for running VSeeFace via Whisky can be found here, also chroma keying out the grey background may be difficult and the wine specific options detailed in the previous link do not seem to be supported. Alternatively, you can look into other options like 3tene or RiBLA Broadcast.
Does VSeeFace run on Linux?
It’s reportedly possible to run it using wine.
Does VSeeFace have special support for RealSense cameras?
No. It would be quite hard to add as well, because OpenSeeFace is only designed to work with regular RGB webcam images for tracking.
What should I look out for when buying a new webcam?
Before looking at new webcams, make sure that your room is well lit. It should be basically as bright as possible. At the same time, if you are wearing glsases, avoid positioning light sources in a way that will cause reflections on your glasses when seen from the angle of the camera. One thing to note is that insufficient light will usually cause webcams to quietly lower their frame rate. For example, my camera will only give me 15 fps even when set to 30 fps unless I have bright daylight coming in through the window, in which case it may go up to 20 fps. You can check the actual camera framerate by looking at the TR (tracking rate) value in the lower right corner of VSeeFace, although in some cases this value might be bottlenecked by CPU speed rather than the webcam.
As far as resolution is concerned, the sweet spot is 720p to 1080p. Going higher won’t really help all that much, because the tracking will crop out the section with your face and rescale it to 224x224, so if your face appears bigger than that in the camera frame, it will just get downscaled. Running the camera at lower resolutions like 640x480 can still be fine, but results will be a bit more jittery and things like eye tracking will be less accurate.
By default, VSeeFace caps the camera framerate at 30 fps, so there is not much point in getting a webcam with a higher maximum framerate. While there is an option to remove this cap, actually increasing the tracking framerate to 60 fps will only make a very tiny difference with regards to how nice things look, but it will double the CPU usage of the tracking process. However, the fact that a camera is able to do 60 fps might still be a plus with respect to its general quality level.
Having a ring light on the camera can be helpful with avoiding tracking issues because it is too dark, but it can also cause issues with reflections on glasses and can feel uncomfortable.
I have heard reports that getting a wide angle camera helps, because it will cover more area and will allow you to move around more before losing tracking because the camera can’t see you anymore, so that might be a good thing to look out for.
As a final note, for higher resolutions like 720p and 1080p, I would recommend looking for an USB3 webcam, rather than a USB2 one. With USB2, the images captured by the camera will have to be compressed (e.g. using MJPEG) before being sent to the PC, which usually makes them look worse and can have a negative impact on tracking quality. With USB3, less or no compression should be necessary and images can probably be transmitted in RGB or YUV format.
Does VSeeFace support Live2D models?
No, VSeeFace only supports 3D models in VRM format. While there are free tiers for Live2D integration licenses, adding Live2D support to VSeeFace would only make sense if people could load their own models. In that case, it would be classified as an “Expandable Application”, which needs a different type of license, for which there is no free tier. As VSeeFace is a free program, integrating an SDK that requires the payment of licensing fees is not an option.
Would a Live2D model be easier on my PC than a 3D model?
While it intuitiviely might seem like it should be that way, it’s not necessarily the case. When using VTube Studio and VSeeFace with webcam tracking, VSeeFace usually uses a bit less system resources. If iPhone (or Android with MeowFace) tracking is used without any webcam tracking, it will get rid of most of the CPU load in both cases, but VSeeFace usually still performs a little better. Of course, it always depends on the specific circumstances. Highly complex 3D models can use up a lot of GPU power, but in the average case, just going Live2D won’t reduce rendering costs compared to 3D models.
I am using a Canon EOS camera and the tracking won’t work.
Try setting the camera settings on the VSeeFace starting screen to default settings. The selection will be marked in red, but you can ignore that and press start anyways. It usually works this way.
I heard that Luppet is good, but I don’t want to pay for it to try it. Is it better than VSeeFace?
You can try Luppet’s free trial.
Does VSeeFace support the Tobii eye tracker?
No, VSeeFace cannot use the Tobii eye tracker SDK due to its its licensing terms.
Can I use VSeeFace with Xsplit Broadcaster?
You can enable the virtual camera in VSeeFace, set a single colored background image and add the VSeeFace camera as a source, then going to the color tab and enabling a chroma key with the color corresponding to the background image. Note that this may not give as clean results as capturing in OBS with proper alpha transparency.
Please note that the camera needs to be reenabled every time you start VSeeFace unless the option to keep it enabled is enabled. This option can be found in the advanced settings section.
Is VSeeFace open source? I heard it was open source.
No. It uses paid assets from the Unity asset store that cannot be freely redistributed. However, the actual face tracking and avatar animation code is open source. You can find it here and here.
Why isn’t VSeeFace open source?
As I wrote here: It uses proprietary assets from the Unity asset store. I could in theory release a repository with all those dependencies removed so people who feel like buying them themselves could build their own version, but keeping a separate repository for that up to date would just mean extra work for me. It’s also my personal feeling that I just simply don’t want to make it open source.
The hard part behind it is the face tracking library, OpenSeeFace, which is open source. You are free to build your own open source VTubing application on top of it.
How can I trigger expressions from AutoHotkey?
It seems that the regular send key command doesn’t work, but adding a delay to prolong the key press helps. You can try something like this:
SendInput, {LCtrl down}{F19 down}
sleep, 40 ; lower sleep time can cause issues on rapid repeated inputs
SendInput, {LCtrl up}{F19 Up}
My face looks different in VSeeFace than in other programs (e.g. one eye is closed, the mouth is always open, …)?
Your model might have a misconfigured “Neutral” expression, which VSeeFace applies by default. Most other programs do not apply the “Neutral” expression, so the issue would not show up in them.
I’m using the new stable version of VRoid (1.0) and VSeeFace is not showing the “Neutral” expression I configured?
VRoid 1.0 lets you configure a “Neutral” expression, but it doesn’t actually export it, so there is nothing for it to apply. You can configure it in Unity instead, as described in this video.
I still have questions or feedback, where should I take it?
If you have any issues, questions or feedback, please come to the #vseeface channel of @Virtual_Deat’s discord server.
Virtual camera
The virtual camera can be used to use VSeeFace for teleconferences, Discord calls and similar. It can also be used in situations where using a game capture is not possible or very slow, due to specific laptop hardware setups.
To use the virtual camera, you have to enable it in the General settings. For performance reasons, it is disabled again after closing the program. Starting with version 1.13.27, the virtual camera will always provide a clean (no UI) image, even while the UI of VSeeFace is not hidden using the small ※ button in the lower right corner.
When using it for the first time, you first have to install the camera driver by clicking the installation button in the virtual camera section of the General settings. This should open an UAC prompt asking for permission to make changes to your computer, which is required to set up the virtual camera. If no such prompt appears and the installation fails, starting VSeeFace with administrator permissions may fix this, but it is not generally recommended. After a successful installation, the button will change to an uninstall button that allows you to remove the virtual camera from your system.
After installation, it should appear as a regular webcam. The virtual camera only supports the resolution 1280x720. Changing the window size will most likely lead to undesirable results, so it is recommended that the Allow window resizing option be disabled while using the virtual camera.
The virtual camera supports loading background images, which can be useful for vtuber collabs over discord calls, by setting a unicolored background.
Should you encounter strange issues with with the virtual camera and have previously used it with a version of VSeeFace earlier than 1.13.22, please try uninstalling it using the UninstallAll.bat, which can be found in VSeeFace_Data\StreamingAssets\UnityCapture. If the camera outputs a strange green/yellow pattern, please do this as well.
Transparent virtual camera
If supported by the capture program, the virtual camera can be used to output video with alpha transparency. To make use of this, a fully transparent PNG needs to be loaded as the background image. Starting with version 1.13.25, such an image can be found in VSeeFace_Data\StreamingAssets. Partially transparent backgrounds are supported as well. Please note that using (partially) transparent background images with a capture program that do not support RGBA webcams can lead to color errors. OBS supports ARGB video camera capture, but require some additional setup. Apparently, the Twitch video capturing app supports it by default.
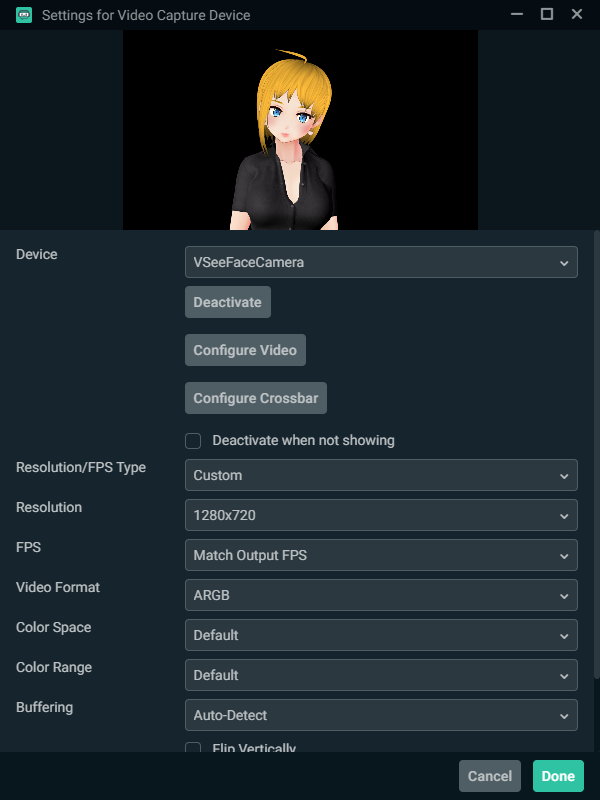
To setup OBS to capture video from the virtual camera with transparency, please follow these settings. The important settings are:
- Resolution/FPS: Custom
- Resolution: 1280x720
- Video Format: ARGB
As the virtual camera keeps running even while the UI is shown, using it instead of a game capture can be useful if you often make changes to settings during a stream.
Network tracking
It is possible to perform the face tracking on a separate PC. This can, for example, help reduce CPU load. This process is a bit advanced and requires some general knowledge about the use of commandline programs and batch files. To do this, copy either the whole VSeeFace folder or the VSeeFace_Data\StreamingAssets\Binary\ folder to the second PC, which should have the camera attached. Inside this folder is a file called run.bat. Running this file will open first ask for some information to set up the camera and then run the tracker process that is usually run in the background of VSeeFace. If you entered the correct information, it will show an image of the camera feed with overlaid tracking points, so do not run it while streaming your desktop. This can also be useful to figure out issues with the camera or tracking in general. The tracker can be stopped with the q, while the image display window is active.
In the following, the PC running VSeeFace will be called PC A, and the PC running the face tracker will be called PC B.
To use it for network tracking, edit the run.bat file or create a new batch file with the following content:
%ECHO OFF

facetracker -l 1

echo Make sure that nothing is accessing your camera before you proceed.

set /p cameraNum=Select your camera from the list above and enter the corresponding number:

facetracker -a %cameraNum%

set /p dcaps=Select your camera mode or -1 for default settings:
set /p fps=Select the FPS:
set /p ip=Enter the LAN IP of the PC running VSeeFace:

facetracker -c %cameraNum% -F %fps% -D %dcaps% -v 3 -P 1 -i %ip% --discard-after 0 --scan-every 0 --no-3d-adapt 1 --max-feature-updates 900

pause
If you would like to disable the webcam image display, you can change -v 3 to -v 0.
When starting this modified file, in addition to the camera information, you will also have to enter the local network IP address of the PC A. You can start and stop the tracker process on PC B and VSeeFace on PC A independently. When no tracker process is running, the avatar in VSeeFace will simply not move.
On the VSeeFace side, select [OpenSeeFace tracking] in the camera dropdown menu of the starting screen. Also, enter this PC’s (PC A) local network IP address in the Listen IP field. Do not enter the IP address of PC B or it will not work. Press the start button. PC A should now be able to receive tracking data from PC B, while the tracker is running on PC B. You can find PC A’s local network IP address by enabling the VMC protocol receiver in the General settings and clicking on Show LAN IP.
If you are sure that the camera number will not change and know a bit about batch files, you can also modify the batch file to remove the interactive input and just hard code the values.
Troubleshooting
If things don’t work as expected, check the following things:
- Starting
run.batshould open a window with black background and grey text. Make sure you entered the necessary information and pressed enter. - While running, many lines showing something like
Took 20msat the beginning should appear. While a face is in the view of the camera, lines withConfidenceshould appear too. A second window should show the camera view and red and yellow tracking points overlaid on the face. If this is not the case, something is wrong on this side of the process. - If the face tracker is running correctly, but the avatar does not move, confirm that the Windows firewall is not blocking the connection and that on both sides the IP address of PC A (the PC running VSeeFace) was entered.
Special blendshapes
VSeeFace has special support for certain custom VRM blend shape clips:
Surprisedis supported by the simple and experimental expression detection features.Brows upandBrows downwill be used for eyebrow tracking if present on a model.- Starting with v1.13.34, if all of the following custom VRM blend shape clips are present on a model, they will be used for audio based lip sync in addition to the regular
A,I,U,EandOblend shapes:SIL,CH,DD,FF,KK,NN,PP,RR,SS,TH
You can refer to this reference for how the mouth should look for each of these visemes. The existing VRM blend shape clipsA,I,U,EandOare mapped toaa,ih,ou,Eandohrespectively. Adding only a subset of the additional VRM blend shape clips is not supported.
I do not recommend using the Blender CATS plugin to automatically generate shapekeys for these blendshapes, because VSeeFace will already follow a similar approach in mixing theA,I,U,EandOshapes by itself, so setting up custom VRM blend shape clips would be unnecessary effort. In this case it is better to have only the standardA,I,U,EandOVRM blend shape clips on the model.
Expression detection
You can set up VSeeFace to recognize your facial expressions and automatically trigger VRM blendshape clips in response. There are two different modes that can be selected in the General settings.
Simple expression detection
This mode is easy to use, but it is limited to the Fun, Angry and Surprised expressions. Simply enable it and it should work. There are two sliders at the bottom of the General settings that can be used to adjust how it works.
To trigger the Fun expression, smile, moving the corners of your mouth upwards. To trigger the Angry expression, do not smile and move your eyebrows down. To trigger the Surprised expression, move your eyebrows up.
Experimental expression detection
This mode supports the Fun, Angry, Joy, Sorrow and Surprised VRM expressions. To use it, you first have to teach the program how your face will look for each expression, which can be tricky and take a bit of time. What kind of face you make for each of them is completely up to you, but it’s usually a good idea to enable the tracking point display in the General settings, so you can see how well the tracking can recognize the face you are making. The following video will explain the process:
When the Calibrate button is pressed, most of the recorded data is used to train a detection system. The rest of the data will be used to verify the accuracy. This will result in a number between 0 (everything was misdetected) and 1 (everything was detected correctly) and is displayed above the calibration button. A good rule of thumb is to aim for a value between 0.95 and 0.98. While this might be unexpected, a value of 1 or very close to 1 is not actually a good thing and usually indicates that you need to record more data. A value significantly below 0.95 indicates that, most likely, some mixup occurred during recording (e.g. your sorrow expression was recorded for your surprised expression). If this happens, either reload your last saved calibration or restart from the beginning.
It is also possible to set up only a few of the possible expressions. This usually improves detection accuracy. However, make sure to always set up the Neutral expression. This expression should contain any kind of expression that should not as one of the other expressions. To remove an already set up expression, press the corresponding Clear button and then Calibrate.
Having an expression detection setup loaded can increase the startup time of VSeeFace even if expression detection is disabled or set to simple mode. To avoid this, press the Clear calibration button, which will clear out all calibration data and preventing it from being loaded at startup. You can always load your detection setup again using the Load calibration button.
VMC protocol support
VSeeFace both supports sending and receiving motion data (humanoid bone rotations, root offset, blendshape values) using the VMC protocol introduced by Virtual Motion Capture. If both sending and receiving are enabled, sending will be done after received data has been applied. In this case, make sure that VSeeFace is not sending data to itself, i.e. the ports for sending and receiving are different, otherwise very strange things may happen.
When receiving motion data, VSeeFace can additionally perform its own tracking and apply it. Track face features will apply blendshapes, eye bone and jaw bone rotations according to VSeeFace’s tracking. If only Track fingers and Track hands to shoulders are enabled, the Leap Motion tracking will be applied, but camera tracking will remain disabled. If any of the other options are enabled, camera based tracking will be enabled and the selected parts of it will be applied to the avatar.
Please note that received blendshape data will not be used for expression detection and that, if received blendshapes are applied to a model, triggering expressions via hotkeys will not work.
You can find a list of applications with support for the VMC protocol here.
Note: VMC protocol operates by transmitting data over the OSC protocol. However, this does not mean that it is compatible with any OSC compatible application, unless that application specifically supports VMC protocol.
VR tracking
To combine VR tracking with VSeeFace’s tracking, you can either use Tracking World or the pixivFANBOX version of Virtual Motion Capture to send VR tracking data over VMC protocol to VSeeFace. This video by Suvidriel explains how to set this up with Virtual Motion Capture.
Model animation or posing
Using the prepared Unity project and scene, pose data will be sent over VMC protocol while the scene is being played. If an animator is added to the model in the scene, the animation will be transmitted, otherwise it can be posed manually as well. For best results, it is recommended to use the same models in both VSeeFace and the Unity scene.
iPhone face tracking
Perfect sync blendshape information and tracking data can be received from the iFacialMocap and FaceMotion3D applications. For this to work properly, it is necessary for the avatar to have the necessary 52 ARKit blendshapes. For VRoid avatars, it is possible to use HANA Tool to add these blendshapes as described below. To do so, make sure that iPhone and PC are connected to one network and start the iFacialMocap app on the iPhone. It should display the phone’s IP address. Enable the iFacialMocap receiver in the general settings of VSeeFace and enter the IP address of the phone. The avatar should now move according to the received data, according to the settings below.
When hybrid lipsync and the Only open mouth according to one source option are enabled, the following ARKit blendshapes are disabled while audio visemes are detected: JawOpen, MouthFunnel, MouthPucker, MouthShrugUpper, MouthShrugLower, MouthClose, MouthUpperUpLeft, MouthUpperUpRight, MouthLowerDownLeft, MouthLowerDownRight
iFacialMocap Troubleshooting
In case of connection issues, you can try the following:
- Make sure the iPhone and PC are on the same network.
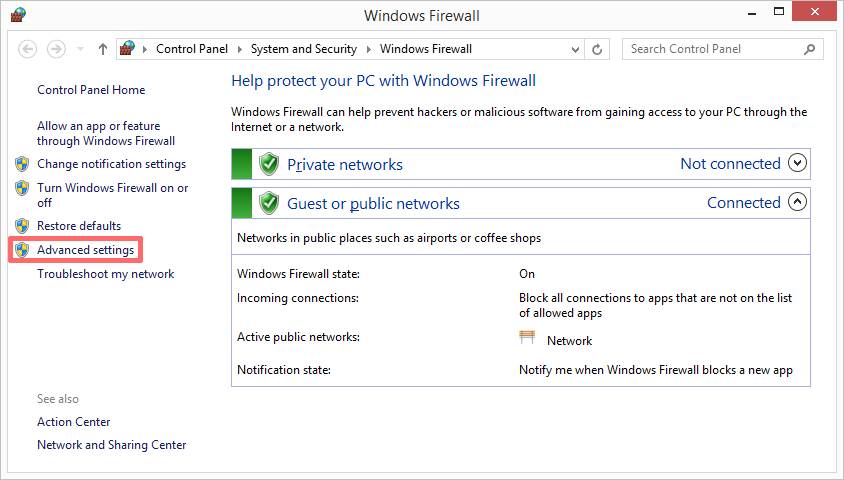
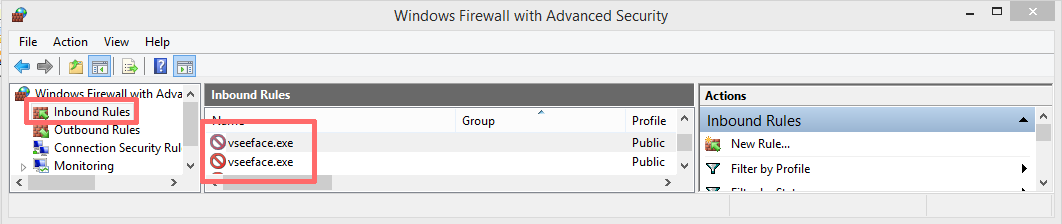
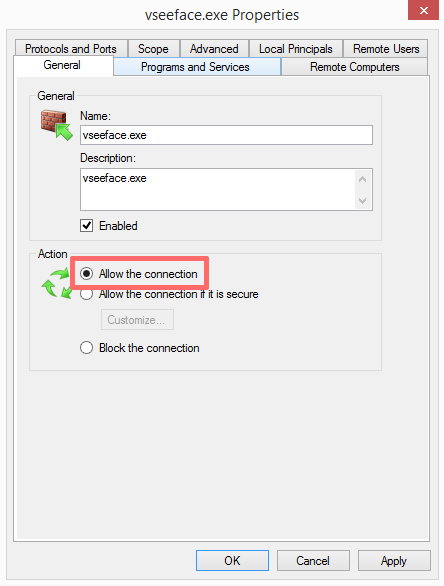
- Check the Windows firewall’s Advanced settings. In there, make sure that in the Inbound Rules VSeeFace is set to accept connections. It was also reported that adjusting the path of the VSeeFace program to include the
.exeat the end can help. If VSeeFace does not show up at all, manually adding it may help. - In iOS, look for iFacialMocap in the app list and ensure that it has the
Local Networkpermission. - Apparently sometimes starting VSeeFace as administrator can help.
- Restart the PC.
Some security and anti virus products include their own firewall that is separate from the Windows one, so make sure to check there as well if you use one.
If it still doesn’t work, you can confirm basic connectivity using the MotionReplay tool. Close VSeeFace, start MotionReplay, enter the iPhone’s IP address and press the button underneath. You should see the packet counter counting up. If the packet counter does not count up, data is not being received at all, indicating a network or firewall issue.
If you encounter issues where the head moves, but the face appears frozen:
- Make sure that all 52 VRM blend shape clips are present.
- Make sure that the various
Track ...options are enabled in the expression settings. - Make sure that there isn’t a still enabled VMC protocol receiver overwriting the face information.
- Check that the
iFacialMocap smoothingslider is not set close to 1.
If you encounter issues with the gaze tracking:
- Make sure that both the gaze strength and gaze sensitivity sliders are pushed up.
- Make sure that there isn’t a still enabled VMC protocol receiver overwriting the face information.
- If your eyes are blendshape based, not bone based, make sure that your model does not have eye bones assigned in the humanoid configuration of Unity. It is also possible to unmap these bones in VRM files by following these steps.
- If your model uses ARKit blendshapes to control the eyes, set the gaze strength slider to zero, otherwise, both bone based eye movement and ARKit blendshape based gaze may get applied.
Waidayo method
Before iFacialMocap support was added, the only way to receive tracking data from the iPhone was through Waidayo or iFacialMocap2VMC.
Certain iPhone apps like Waidayo can send perfect sync blendshape information over the VMC protocol, which VSeeFace can receive, allowing you to use iPhone based face tracking. This requires an especially prepared avatar containing the necessary blendshapes. A list of these blendshapes can be found here. You can find an example avatar containing the necessary blendshapes here. An easy, but not free, way to apply these blendshapes to VRoid avatars is to use HANA Tool. It is also possible to use VSeeFace with iFacialMocap through iFacialMocap2VMC.
To combine iPhone tracking with Leap Motion tracking, enable the Track fingers and Track hands to shoulders options in VMC reception settings in VSeeFace. Enabling all over options except Track face features as well, will apply the usual head tracking and body movements, which may allow more freedom of movement than just the iPhone tracking on its own.
Waidayo step by step guide
- Make sure the iPhone and PC to are on one network
- Run VSeeFace
- Load a compatible avatar (sample, it’s also possible to apply those blendshapes to a VRoid avatar using HANA Tool)
- Do select a camera on the starting screen as usual, do not select “[Network tracking]” or “[OpenSeeFace tracking]”, as this option refers to something else. If you do not have a camera, select “[OpenSeeFace tracking]”, but leave the fields empty.
- Disable the VMC protocol sender in the general settings if it’s enabled
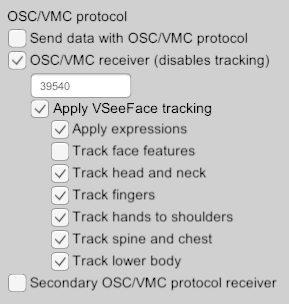
- Enable the VMC protocol receiver in the general settings
- Change the port number from 39539 to 39540
- Under the VMC receiver, enable all the “Track …” options except for face features at the top
- The settings should look like this
- You should now be able to move your avatar normally, except the face is frozen other than expressions
- Install and run Waidayo on the iPhone
- Load your model into Waidayo by naming it default.vrm and putting it into the Waidayo app’s folder on the phone like this or transfer it using this application (I’m not sure, if you have more clear instructions I can put here, please let me know)
- Go to the settings (設定) in Waidayo
- Set
Send Motion IP Addressto your PC’s LAN IP address. You can find it by clicking onShow LAN IPat the beginning of the VMC protocol receiver settings in VSeeFace. - Make sure that the port is set to the same number as in VSeeFace (39540)
- Your model’s face should start moving, including some special things like puffed cheeks, tongue or smiling only on one side
If VSeeFace’s tracking should be disabled to reduce CPU usage, only enable “Track fingers” and “Track hands to shoulders” on the VMC protocol receiver. This should lead to VSeeFace’s tracking being disabled while leaving the Leap Motion operable. If the tracking remains on, this may be caused by expression detection being enabled. In this case, additionally set the expression detection setting to none.
Using HANA Tool to add perfect sync blendshapes to VRoid models
A full Japanese guide can be found here. The following gives a short English language summary. To use HANA Tool to add perfect sync blendshapes to a VRoid model, you need to install Unity, create a new project and add the UniVRM package and then the VRM version of the HANA Tool package to your project. You can do this by dragging in the .unitypackage files into the file section of the Unity project. Next, make sure that your VRoid VRM is exported from VRoid v0.12 (or whatever is supported by your version of HANA_Tool) without optimizing or decimating the mesh. Create a folder for your model in the Assets folder of your Unity project and copy in the VRM file. It should now get imported.
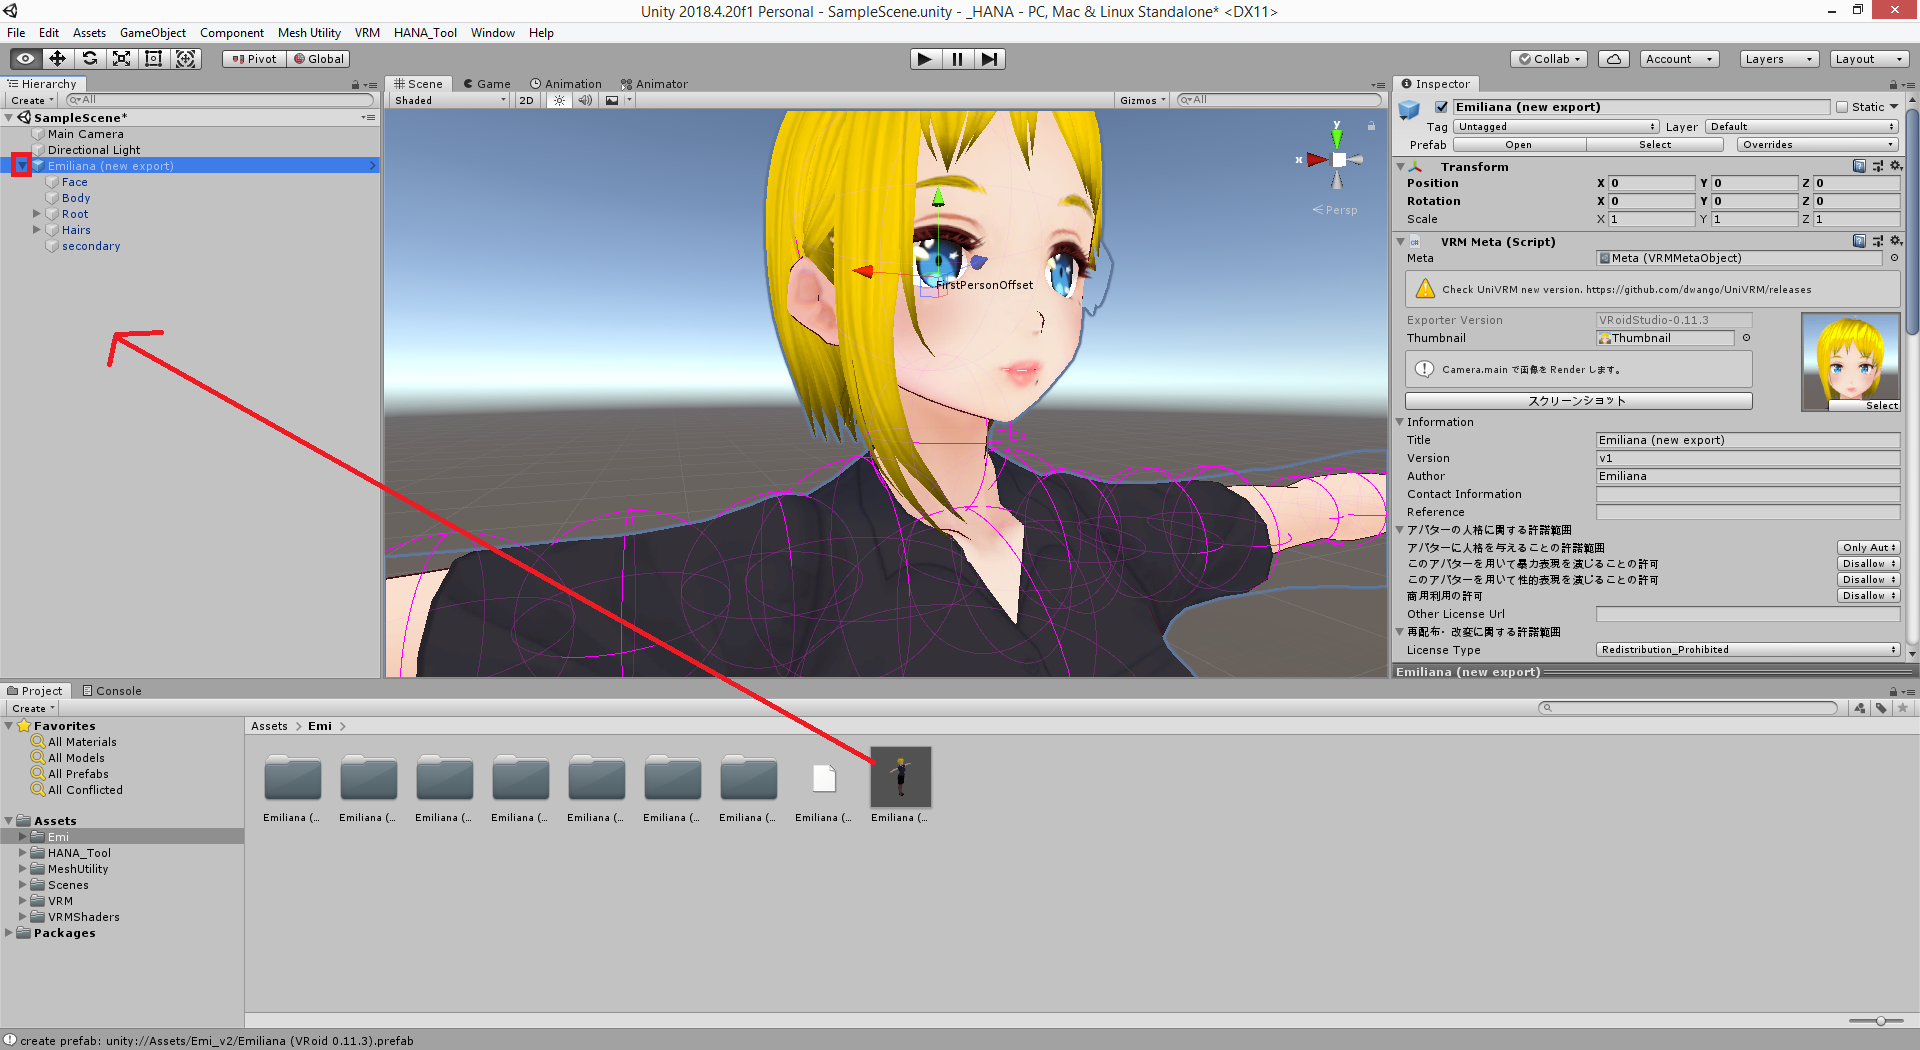
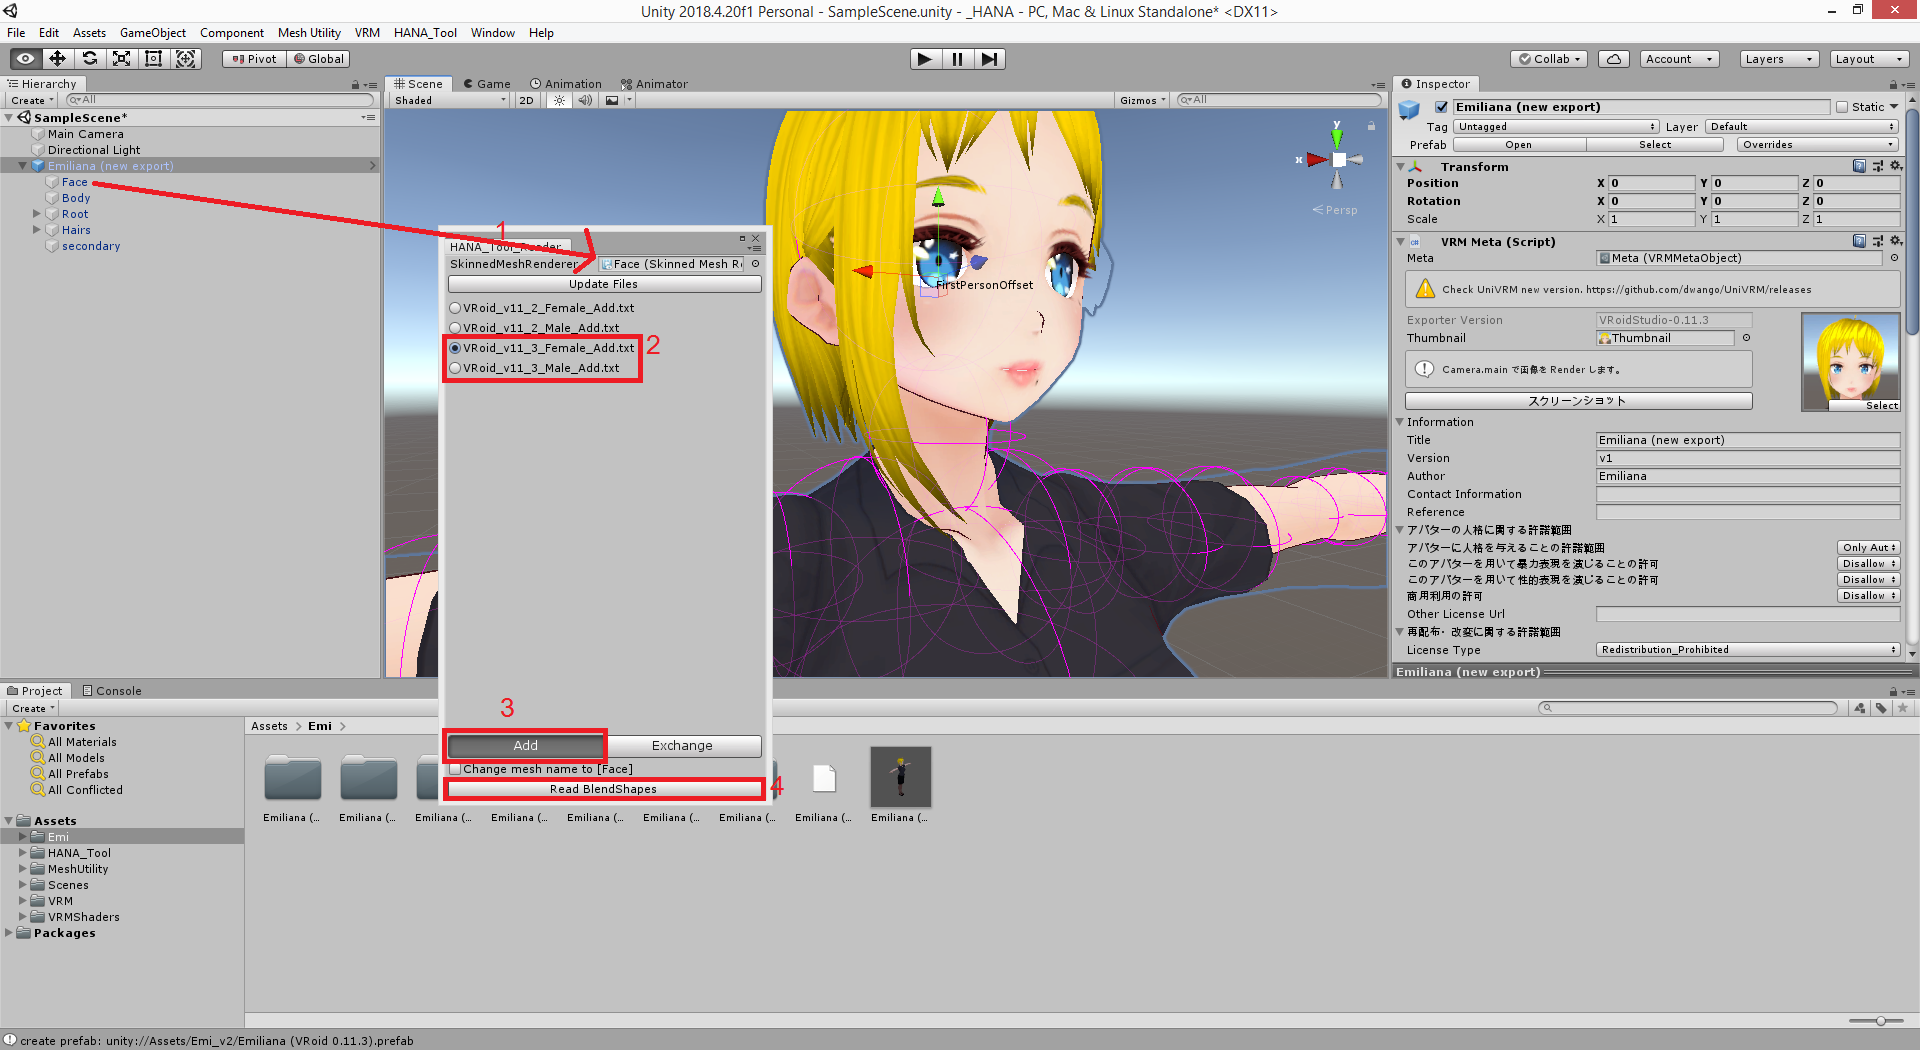
- Drag the model file from the files section in Unity to the hierarchy section. It should now appear in the scene view. Click the triangle in front of the model in the hierarchy to unfold it. You should see an entry called
Face. (Screenshot) - From the
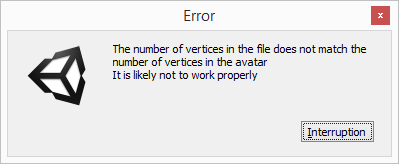
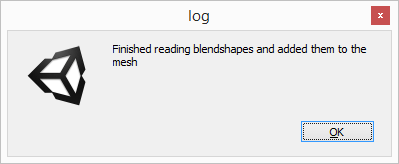
HANA_Toolmenu at the top, selectReader. A new window should appear. Drag theFaceobject into theSkinnedMeshRendererslot at the top of the new window. Select the VRoid version and type of your model. Make sure to selectAddat the bottom, then clickRead BlendShapes. (Screenshot) - If you get a message window with a long message about the number of vertices not matching, it means that your model does not match the requirements. It might be exported from a different VRoid version, have been decimated or edited etc. If you get a window with saying 変換完了 or that it finished reading blendshapes, the blendshapes were successfully added and you can close the
Readerwindow. - From the
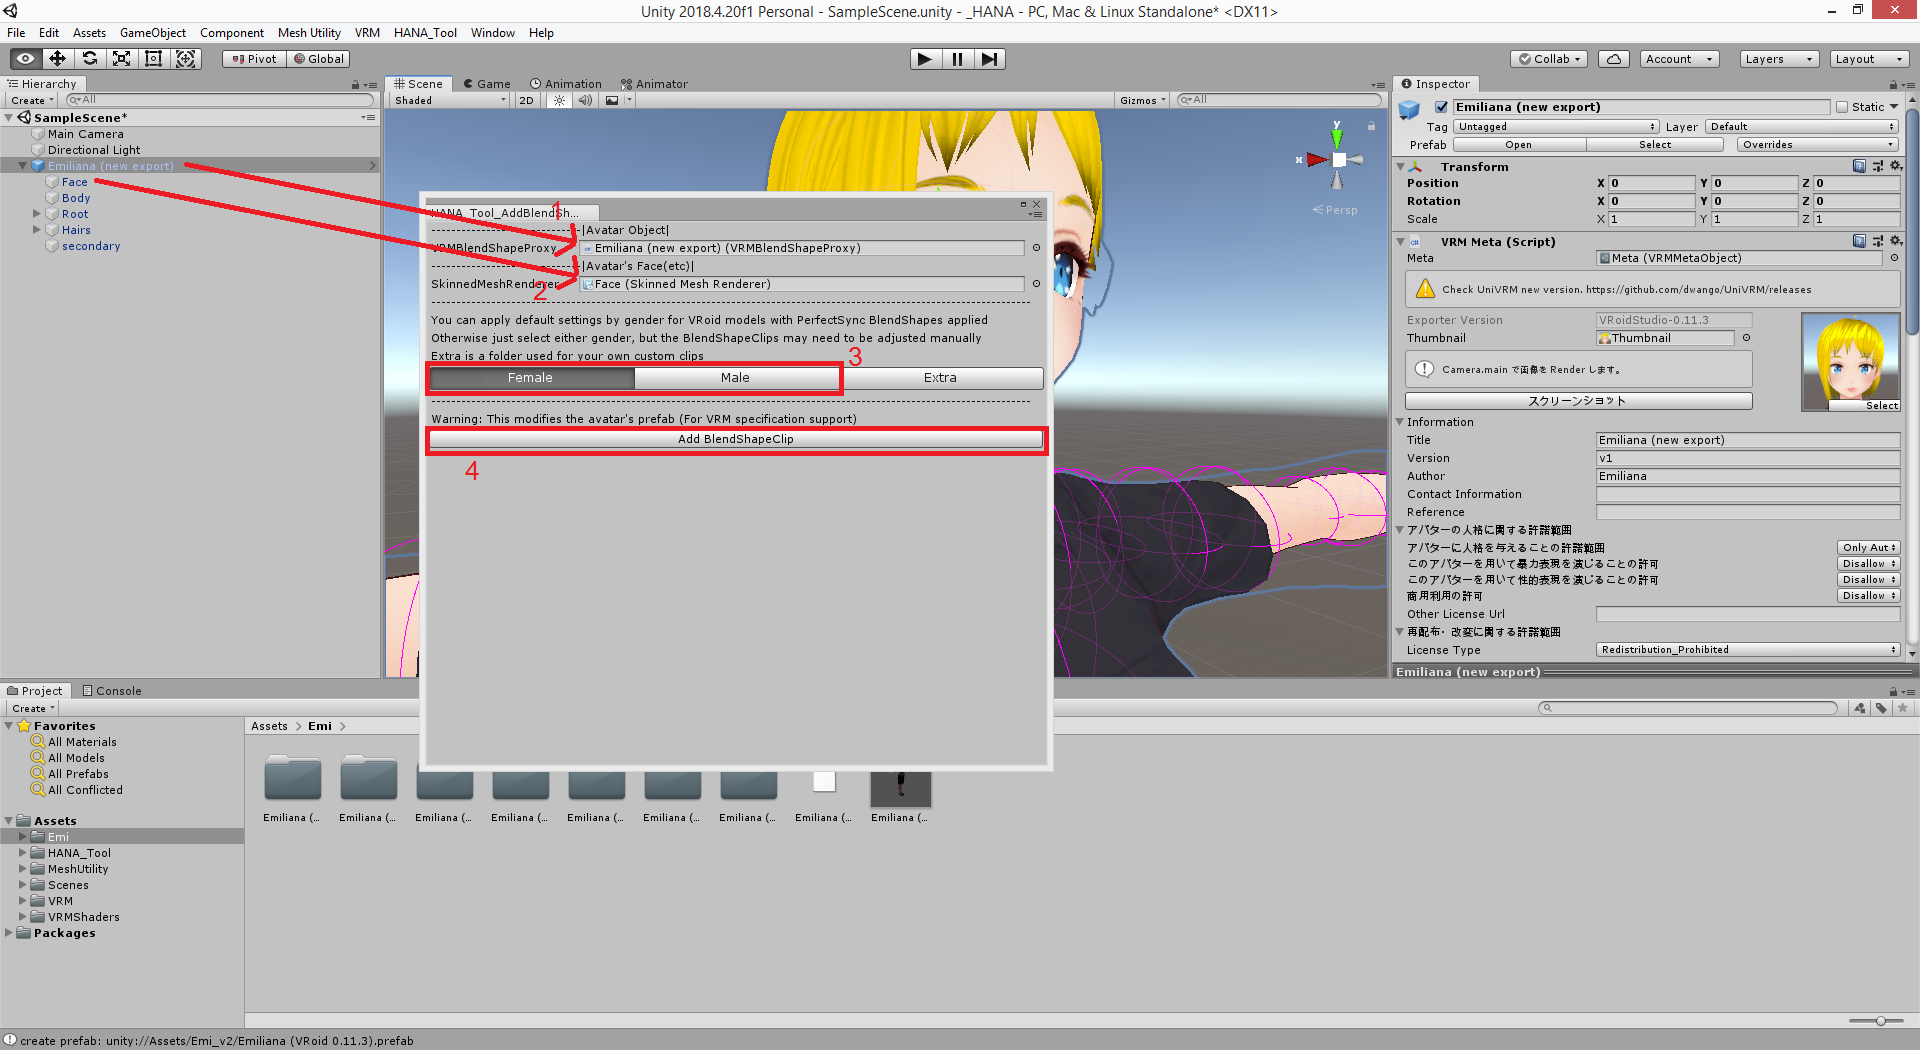
HANA_Toolmenu at the top, selectClipBuilder. A new window should appear. Drag the model from the hierarchy into the slot at the top and run it. For older versions than v2.9.5b, selectAddBlendShapeClip. A new window should appear. Drag the model from the hierarchy into theVRMBlendShapeProxyslot at the top of the new window. Again, drag theFaceobject into theSkinnedMeshRendererslot underneath. Select your model type, notExtraand press the button at the bottom. (Screenshot) - You should get a window with saying it successfully added the blendshape clips or 変換完了, meaning you can close this window as well.
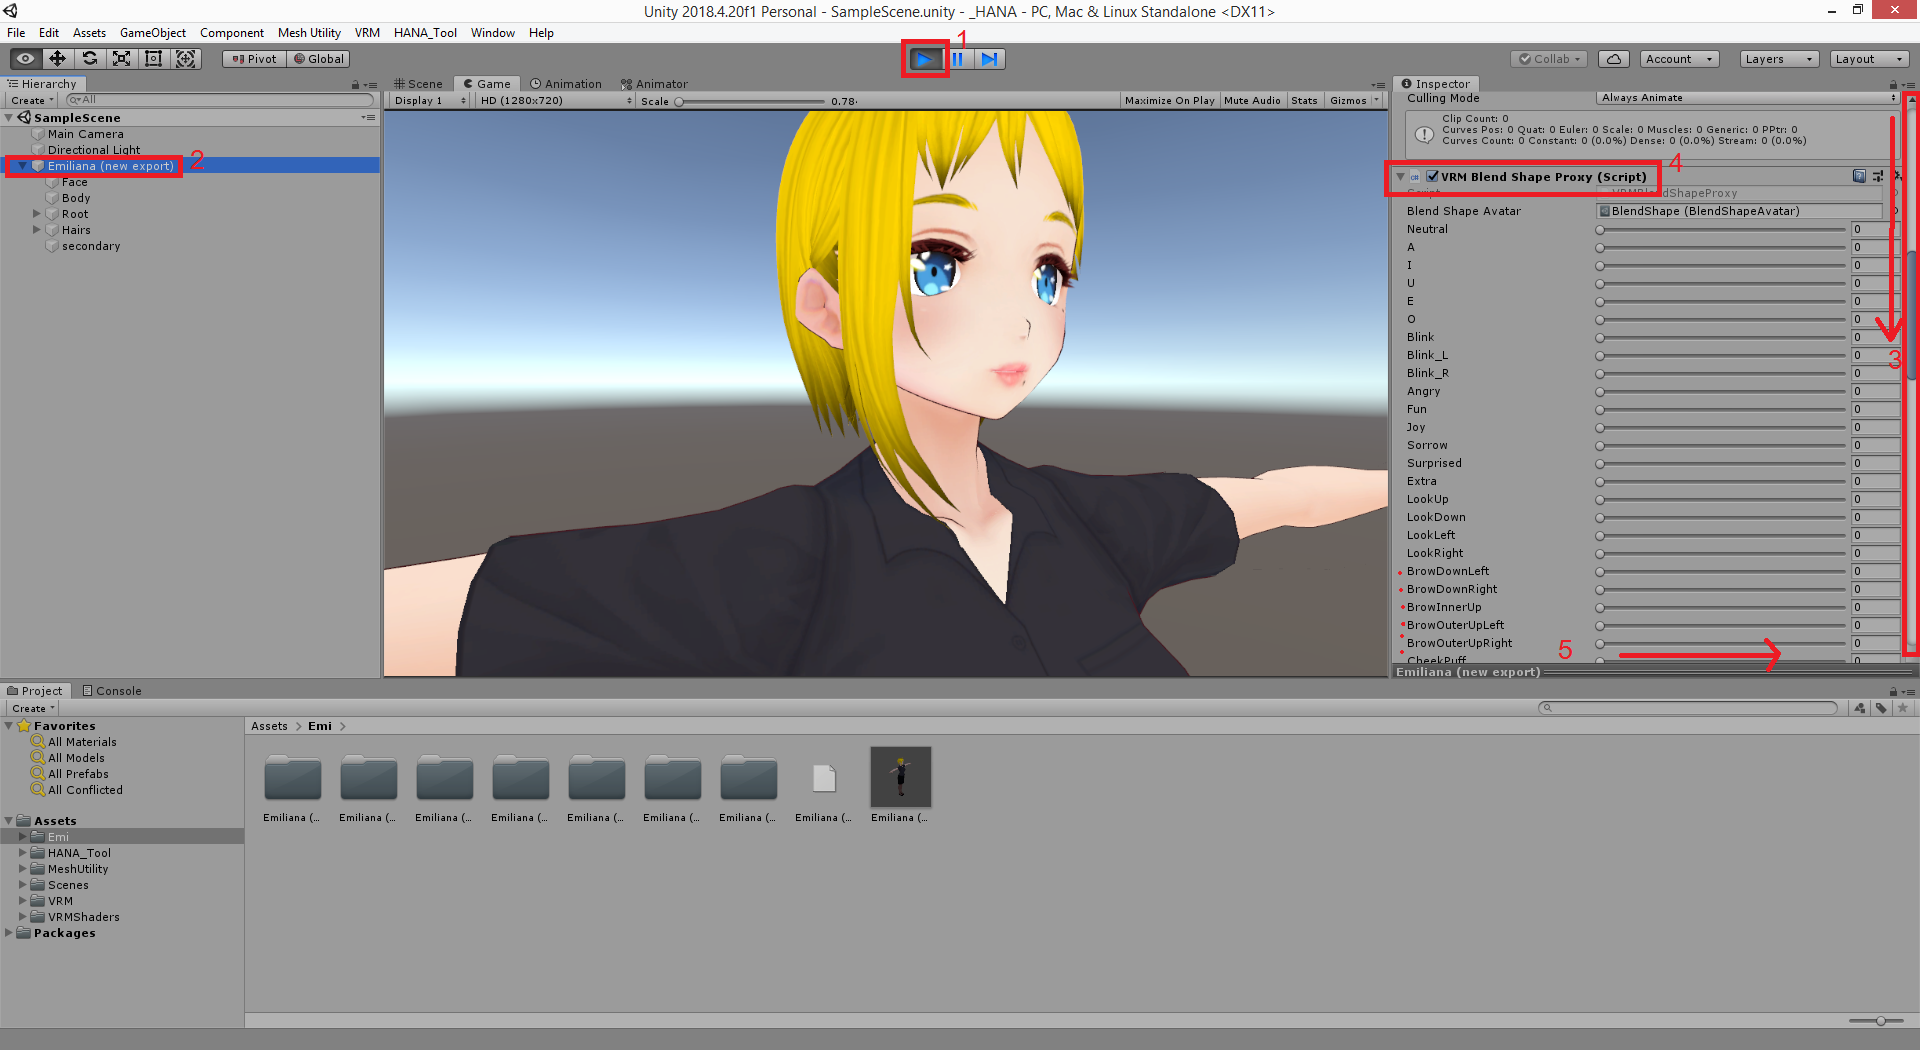
- Try pressing the play button in Unity, switch back to the
Scenetab and select your model in the hierarchy. Scroll down in the inspector until you see a list of blend shapes. You should be able to move the sliders and see the face of your model change. Below the regular VRM and VRoid blendshapes, there should now be a bit more than 50 additional blendshapes for perfect sync use, such as one to puff your cheeks. (Screenshot) - Stop the scene, select your model in the hierarchy and from the
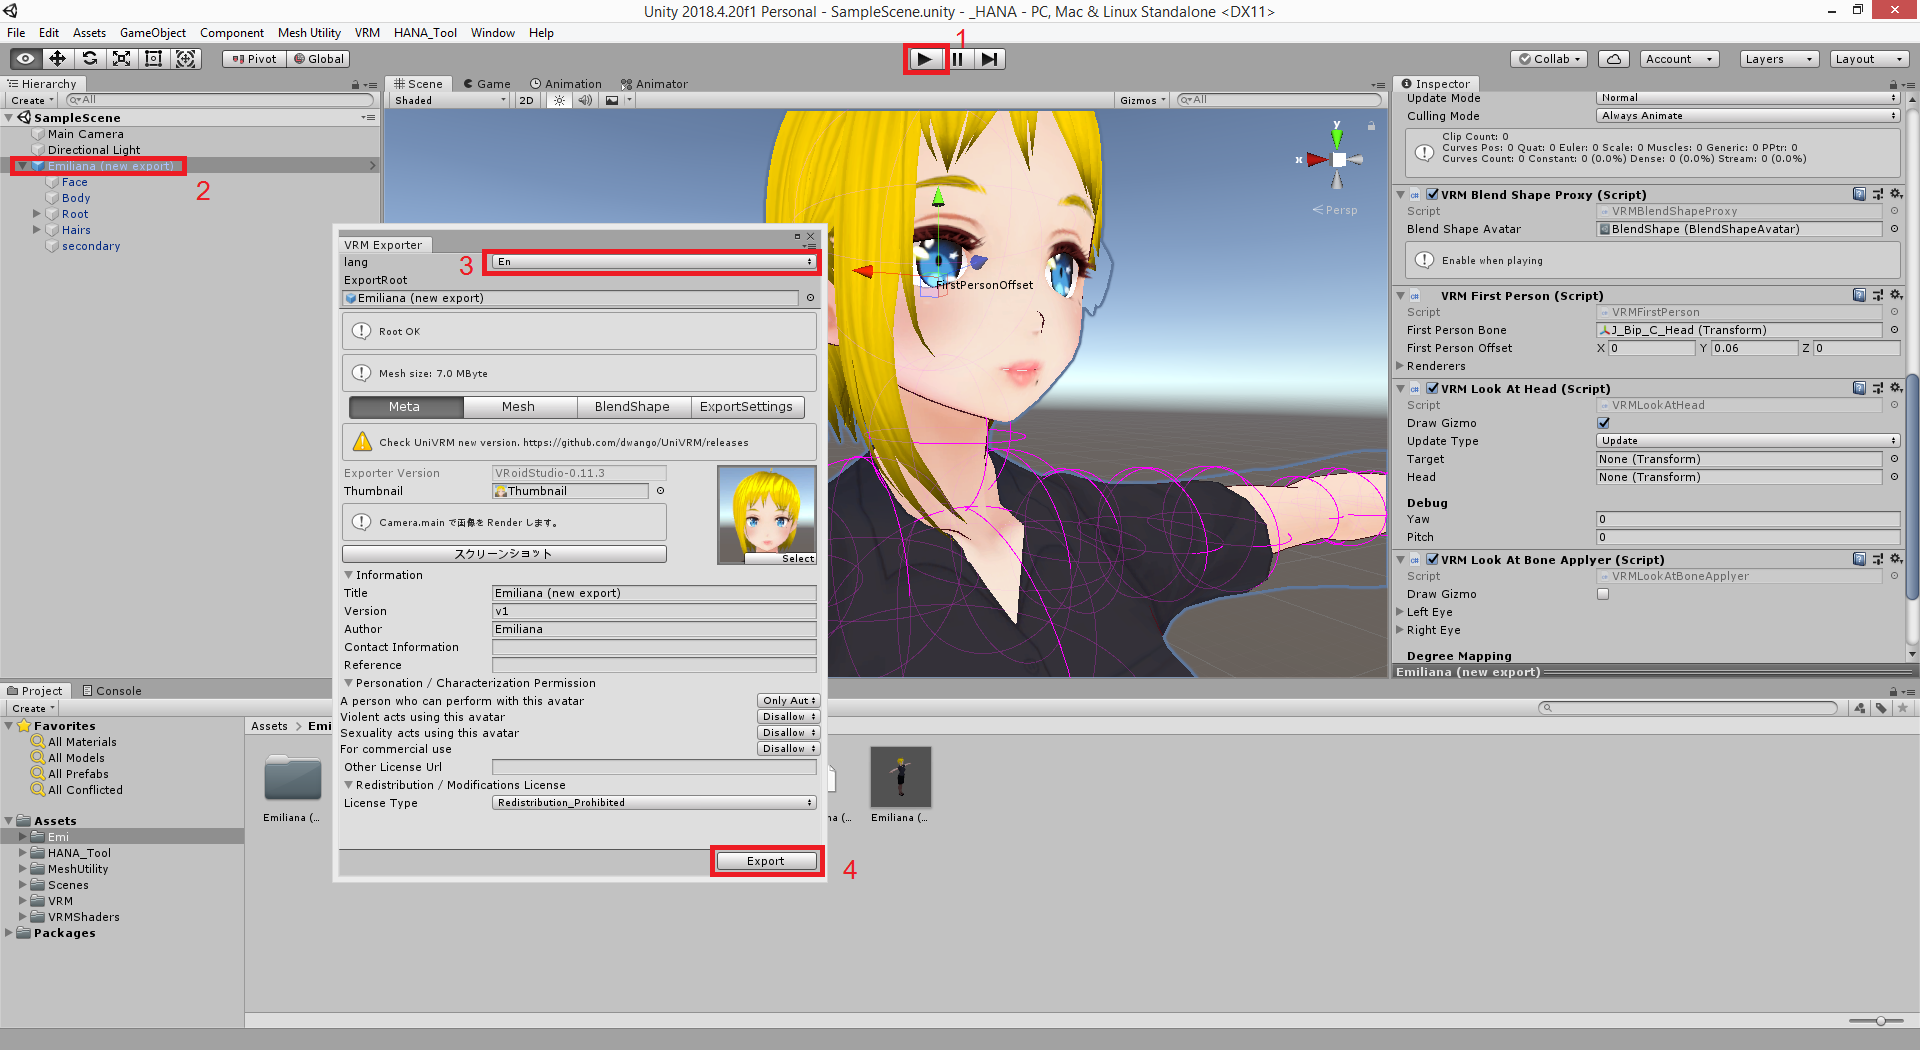
VRMmenu, selectUniVRM, thenExport humanoid. All the necessary details should already be filled in, so you can press export to save your new VRM file. (Screenshot)
Perception Neuron tracking
It is possible to stream Perception Neuron motion capture data into VSeeFace by using the VMC protocol. To do so, load this project into Unity 2019.4.31f1 and load the included scene in the Scenes folder. Create a new folder for your VRM avatar inside the Avatars folder and put in the VRM file. Unity should import it automatically. You can then delete the included Vita model from the the scene and add your own avatar by dragging it into the Hierarchy section on the left.
You can now start the Neuron software and set it up for transmitting BVH data on port 7001. Once this is done, press play in Unity to play the scene. If no red text appears, the avatar should have been set up correctly and should be receiving tracking data from the Neuron software, while also sending the tracking data over VMC protocol.
Next, you can start VSeeFace and set up the VMC receiver according to the port listed in the message displayed in the game view of the running Unity scene. Once enabled, it should start applying the motion tracking data from the Neuron to the avatar in VSeeFace.
The provided project includes NeuronAnimator by Keijiro Takahashi and uses it to receive the tracking data from the Perception Neuron software and apply it to the avatar.
Full body tracking with ThreeDPoseTracker
ThreeDPoseTracker allows webcam based full body tracking. While the ThreeDPoseTracker application can be used freely for non-commercial and commercial uses, the source code is for non-commercial use only.
It allows transmitting its pose data using the VMC protocol, so by enabling VMC receiving in VSeeFace, you can use its webcam based fully body tracking to animate your avatar. From what I saw, it is set up in such a way that the avatar will face away from the camera in VSeeFace, so you will most likely have to turn the lights and camera around. By enabling the Track face features option, you can apply VSeeFace’s face tracking to the avatar.
VMC protocol receiver troubleshooting
If you can’t get VSeeFace to receive anything, check these things first:
- Probably the most common issue is that the Windows firewall blocks remote connections to VSeeFace, so you might have to dig into its settings a bit to remove the block.
- Make sure both the phone and the PC are on the same network. If the phone is using mobile data it won’t work. Sometimes, if the PC is on multiple networks, the “Show IP” button will also not show the correct address, so you might have to figure it out using
ipconfigor some other way. - Try disabling all the
Track ...options to make sure the received tracking data isn’t getting overwritten by VSeeFace’s own tracking.
VRChat OSC support
Starting with 1.13.38, there is experimental support for VRChat’s avatar OSC support. When the VRChat OSC sender option in the advanced settings is enabled in VSeeFace, it will send the following avatar parameters:
GazeX, afloatfrom 0 to 1 with representing the horizontal gaze direction from right to left and 0.5 being the eyes looking straight forward.GazeY, afloatfrom 0 to 1 with representing the horizontal gaze direction from down to up and 0.5 being the eyes looking straight forward.Blink, afloatfrom 0 to 1 with the eyes being fully opened at 0 and fully closed at 1.MouthOpen, afloatfrom 0 to 1 with the mouth being fully closed at 0 and fully open at 1.MouthWideNarrow, afloatfrom -1 to 1 with the mouth having its regular shape at 0, being wider than normal at -1 and narrower than normal at 1. This will only become active when the mouth is also at least slightly open. Configuring a 0.25 deadzone around 0 might be advisable.BrowsDownUp, afloatfrom -1 to 1 with the brows being all the way down at -1 and all the way up at 1, with 0 being the brows being at their default position.
To make use of these parameters, the avatar has to be specifically set up for it. If it is, using these parameters, basic face tracking based animations can be applied to an avatar. As wearing a VR headset will interfere with face tracking, this is mainly intended for playing in desktop mode.
Note: Only webcam based face tracking is supported at this point.
Model preview in Unity
If you are working on an avatar, it can be useful to get an accurate idea of how it will look in VSeeFace before exporting the VRM. You can load this example project into Unity 2019.4.16f1 and load the included preview scene to preview your model with VSeeFace like lighting settings. This project also allows posing an avatar and sending the pose to VSeeFace using the VMC protocol starting with VSeeFace v1.13.34b.
After loading the project in Unity, load the provided scene inside the Scenes folder. If you press play, it should show some instructions on how to use it.
If you prefer settings things up yourself, the following settings in Unity should allow you to get an accurate idea of how the avatar will look with default settings in VSeeFace:
- (Screenshot)
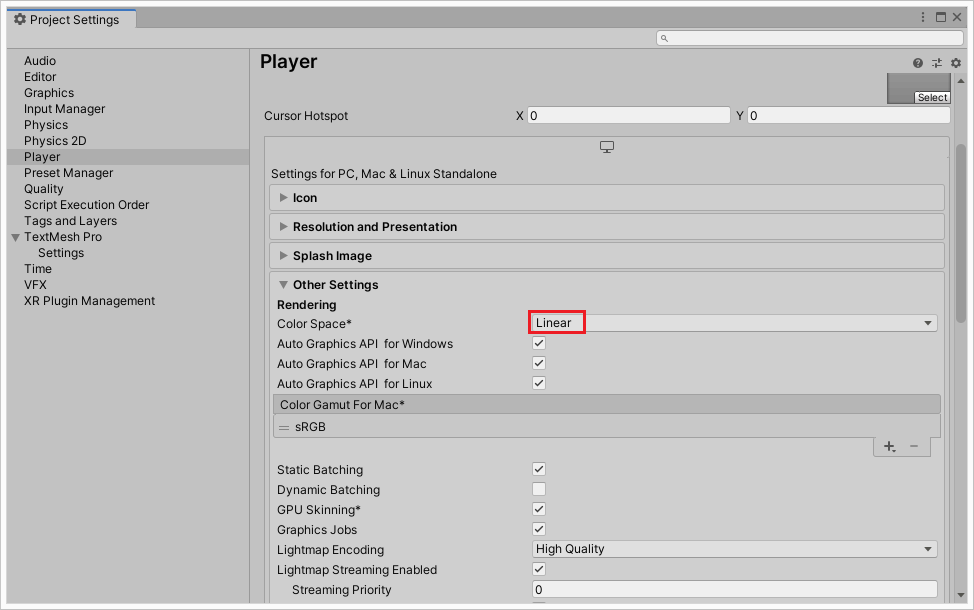
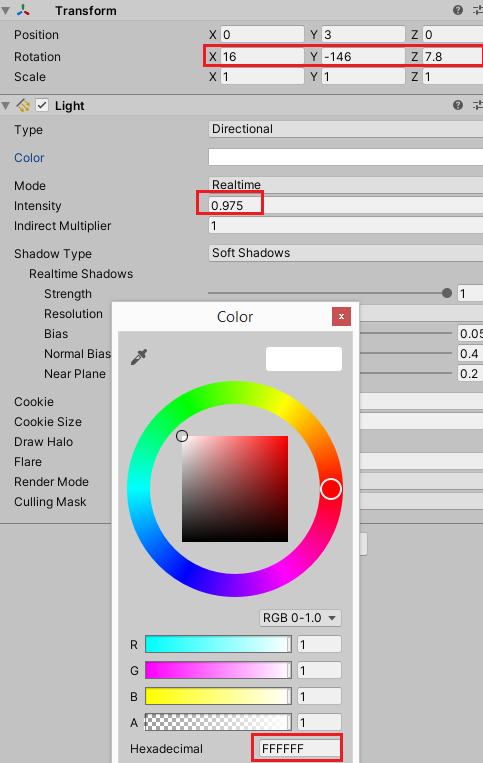
Edit -> Project Settings... -> Player -> Other Settings -> Color Space: Linear - (Screenshot) Directional light: Color: FFFFFF (Hexadecimal), Intensity: 0.975, Rotation: 16, -146, -7.8, Shadow Type: No shadows
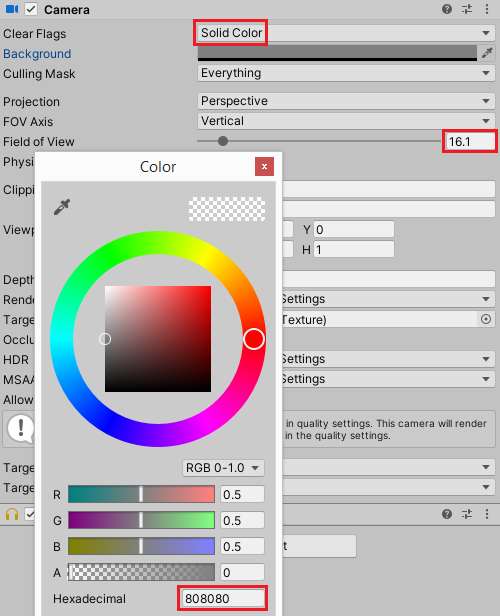
- (Screenshot) Camera icon next to Gizmos: Field of View: 16.1 (default focal length of 85mm) or 10.2 (135mm)
- (Screenshot) Optional, Main Camera: Clear Flags: Solid Color, Background: 808080 (Hexadecimal), Field of View: as above
- (Screenshot)
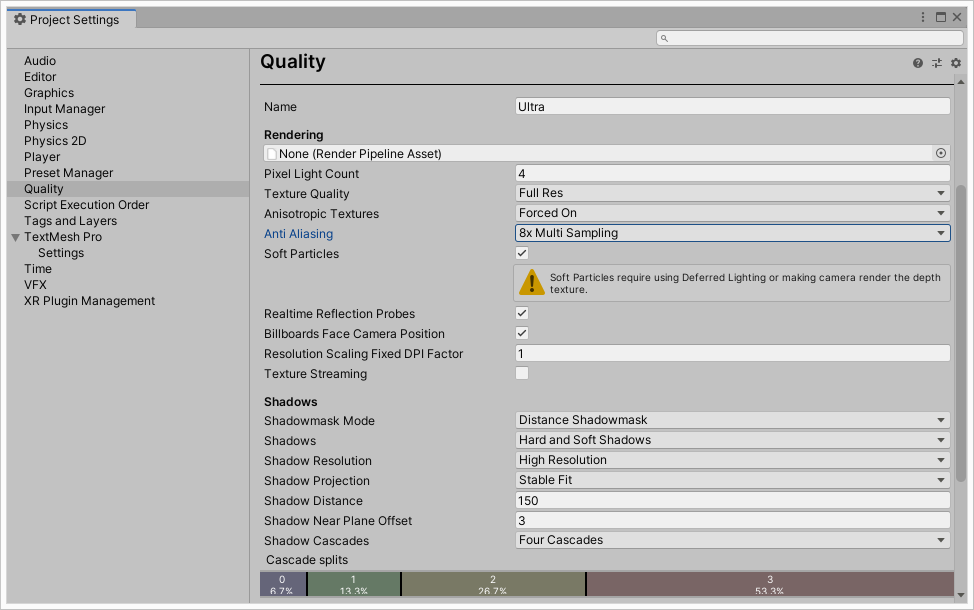
Edit -> Project Settings... -> Quality, selectUltraand set the anti-aliasing to 8x
If you enabled shadows in the VSeeFace light settings, set the shadow type on the directional light to soft.
To see the model with better light and shadow quality, use the Game view. You can align the camera with the current scene view by pressing Ctrl+Shift+F or using Game Object -> Align with view from the menu.
Translations
It is possible to translate VSeeFace into different languages and I am happy to add contributed translations! To add a new language, first make a new entry in VSeeFace_Data\StreamingAssets\Strings\Languages.json with a new language code and the name of the language in that language. The language code should usually be given in two lowercase letters, but can be longer in special cases. For a partial reference of language codes, you can refer to this list. Afterwards, make a copy of VSeeFace_Data\StreamingAssets\Strings\en.json and rename it to match the language code of the new language. Now you can edit this new file and translate the "text" parts of each entry into your language. The "comment" might help you find where the text is used, so you can more easily understand the context, but it otherwise doesn’t matter.
New languages should automatically appear in the language selection menu in VSeeFace, so you can check how your translation looks inside the program. Note that a JSON syntax error might lead to your whole file not loading correctly. In this case, you may be able to find the position of the error, by looking into the Player.log, which can be found by using the button all the way at the bottom of the general settings.
Generally, your translation has to be enclosed by doublequotes "like this". If double quotes occur in your text, put a \ in front, for example "like \"this\"". Line breaks can be written as \n.
Translations are coordinated on GitHub in the VSeeFaceTranslations repository, but you can also send me contributions over Twitter or Discord DM.
Running on Linux and maybe Mac
If you encounter very high CPU usage, please try deleting or renaming LeapCV5.dll and see if that helps.
Since OpenGL got deprecated on MacOS, it currently doesn’t seem to be possible to properly run VSeeFace even with wine. Models end up not being rendered.
Some people have gotten VSeeFace to run on Linux through wine and it might be possible on Mac as well, but nobody tried, to my knowledge. However, reading webcams is not possible through wine versions before 6. Starting with wine 6, you can try just using it normally.
For previous versions or if webcam reading does not work properly, as a workaround, you can set the camera in VSeeFace to [OpenSeeFace tracking] and run the facetracker.py script from OpenSeeFace manually. To do this, you will need a Python 3.7 or newer installation. To set up everything for the facetracker.py, you can try something like this on Debian based distributions:
sudo apt-get install python3 python3-pip python3-virtualenv git
git clone https://github.com/emilianavt/OpenSeeFace
cd OpenSeeFace
virtualenv -p python3 env
source env/bin/activate
pip3 install onnxruntime opencv-python pillow numpy
To run the tracker, first enter the OpenSeeFace directory and activate the virtual environment for the current session:
source env/bin/activate
Then you can run the tracker:
python facetracker.py -c 0 -W 1280 -H 720 --discard-after 0 --scan-every 0 --no-3d-adapt 1 --max-feature-updates 900
Running this command, will send the tracking data to a UDP port on localhost, on which VSeeFace will listen to receive the tracking data. The -c argument specifies which camera should be used, with the first being 0, while -W and -H let you specify the resolution. To see the webcam image with tracking points overlaid on your face, you can add the arguments -v 3 -P 1 somewhere.
Notes on running wine: First make sure you have the Arial font installed. You can put Arial.ttf in your wine prefix’s C:\Windows\Fonts folder and it should work. Secondly, make sure you have the 64bit version of wine installed. It often comes in a package called wine64. Also make sure that you are using a 64bit wine prefix. After installing wine64, you can set one up using WINEARCH=win64 WINEPREFIX=~/.wine64 wine whatever, then unzip VSeeFace in ~/.wine64/drive_c/VSeeFace and run it with WINEARCH=win64 WINEPREFIX=~/.wine64 wine VSeeFace.exe. You may also have to install the Microsoft Visual C++ 2015 runtime libraries, which can be done using the winetricks script with winetricks vcrun2015.
Starting with VSeeFace v1.13.33f, while running under wine --background-color '#00FF00' can be used to set a window background color. To disable wine mode and make things work like on Windows, --disable-wine-mode can be used.
Limitations: The virtual camera, Spout2 and Leap Motion support probably won’t work. If a virtual camera is needed, OBS provides virtual camera functionality and the captured window can be reexported using this. In some cases extra steps may be required to get it to work.
On v1.13.37c and later, it is necessary to delete GPUManagementPlugin.dll to be able to run VSeeFace with wine. This should be fixed on the latest versions.
Troubleshooting
This section lists common issues and possible solutions for them.
Startup issues
Some users are reporting issues with NVIDIA driver version 526 causing VSeeFace to crash or freeze when starting after showing the Unity logo. First make sure, that you are using VSeeFace v1.13.38c2, which should solve the issue in most cases. You can also try running UninstallAll.bat in VSeeFace_Data\StreamingAssets\UnityCapture as a workaround. If this does not work, please roll back your NVIDIA driver (set “Recommended/Beta:” to “All”) to 522 or earlier for now. This should fix usually the issue. Generally, since the issue is triggered by certain virtual camera drivers, uninstalling all virtual cameras should be effective as well. Another workaround is to set VSeeFace to run in Windows 8 compatibility mode, but this might cause issues in the future, so it’s only recommended as a last resort.
If the VSeeFace window remains black when starting and you have an AMD graphics card, please try disabling Radeon Image Sharpening either globally or for VSeeFace. It reportedly can cause this type of issue.
If an error appears after pressing the Start button, please confirm that the VSeeFace folder is correctly unpacked. Previous causes have included:
- A full disk caused the unpacking process to file, so files were missing from the VSeeFace folder. Solution: Free up additional space, delete the VSeeFace folder and unpack it again.
- A corrupted download caused missing files. Solution: Download the archive again, delete the VSeeFace folder and unpack a fresh copy of VSeeFace.
- An anti virus software has deleted
VSeeFace_Data\StreamingAssets\Binary\facetracker.exe, which is necessary for the correct operation of VSeeFace. Please confirm that this file exists and, if not, check whether it has been removed by anti virus software.
If no window with a graphical user interface appears, please confirm that you have downloaded VSeeFace and not OpenSeeFace, which is just a backend library.
Webcam and tracking issues
If you get an error message that the tracker process has disappeared, first try to follow the suggestions given in the error. If none of them help, press the Open logs button. If an error like the following:
  File "cv2__init__.py", line 3, in <module>
ImportError: DLL load failed: %1 is not a valid Win32 application.
appears near the end of the error.txt that should have opened, you probably have an N edition of Windows. These Windows N editions mostly distributed in Europe are missing some necessary multimedia libraries. Follow these steps to install them.
If tracking doesn’t work, you can actually test what the camera sees by running the run.bat in the VSeeFace_Data\StreamingAssets\Binary folder. Before running it, make sure that no other program, including VSeeFace, is using the camera. After starting it, you will first see a list of cameras, each with a number in front of it. Enter the number of the camera you would like to check and press enter. Next, it will ask you to select your camera settings as well as a frame rate. You can enter -1 to use the camera defaults and 24 as the frame rate. Press enter after entering each value. After this, a second window should open, showing the image captured by your camera. If your face is visible on the image, you should see red and yellow tracking dots marked on your face. You can use this to make sure your camera is working as expected, your room has enough light, there is no strong light from the background messing up the image and so on. If the tracking points accurately track your face, the tracking should work in VSeeFace as well. To close the window, either press q in the window showing the camera image or press Ctrl+C in the console window.
If you would like to see the camera image while your avatar is being animated, you can start VSeeFace while run.bat is running and select [OpenSeeFace tracking] in the camera option. It should receive the tracking data from the active run.bat process. If you can see your face being tracked by the run.bat, but VSeeFace won’t receive the tracking from the run.bat while set to [OpenSeeFace tracking], please check if you might have a VPN running that prevents the tracker process from sending the tracking data to VSeeFace. Apparently some VPNs have a setting that causes this type of issue.
If the run.bat works with the camera settings set to -1, try setting your camera settings in VSeeFace to Camera defaults. The option will look red, but it sometimes works.
If an error message about the tracker process appears, it may be necessary to restart the program and, on the first screen of the program, enter a different camera resolution and/or frame rate that is known to be supported by the camera. To figure out a good combination, you can try adding your webcam as a video source in OBS and play with the parameters (resolution and frame rate) to find something that works.
Should the tracking still not work, one possible workaround is to capture the actual webcam using OBS and then re-export it as a camera using OBS-VirtualCam.
If tracking randomly stops and you are using Streamlabs, you could see if it works properly with regular OBS. Another issue could be that Windows is putting the webcam’s USB port to sleep. You can disable this behaviour as follow:
- Open the Windows
Control Panel - Press Ctrl+F, search for
Device Managerand open it - Click the
+atUniversal Serial Bus Controllers - Right click
USB Root Huband selectProperties - Open the
Power Managementtab - Clear the checkmark from
Allow the computer to turn off this device to save powerand click OK - Repeat this procedure for the USB 2.0 Hub and any other USB Hub devices
Alternatively or in addition, you can try the following approach:
- Open the Windows
Control Panel - Press Ctrl+F, search for
Power Optionsand open them - Click on
Change plan settingsfor your currently selected plan - Click on
Change advcanced power settings - In the window that opens, click the
+in front ofUSB settings - Click the
+in front ofUSB selective suspend setting - Change the setting to
Disabledand click OK
Please note that this is not a guaranteed fix by far, but it might help. If you are using a laptop where battery life is important, I recommend only following the second set of steps and setting them up for a power plan that is only active while the laptop is charging.
One it was also reported that the registry change described on this can help with issues of this type on Windows 10.
Checking what the facetracker.exe sees
If you want to check how the tracking sees your camera image, which is often useful for figuring out tracking issues, first make sure that no other program, including VSeeFace, is using the camera. Then, navigate to the VSeeFace_Data\StreamingAssets\Binary folder inside the VSeeFace folder and double click on run.bat, which might also be displayed as just run.
A console window should open and ask you to select first which camera you’d like to use and then which resolution and video format to use. In both cases, enter the number given on the line of the camera or setting you would like to choose. For the second question, you can also enter -1 to use the camera’s default settings, which is equivalent to not selecting a resolution in VSeeFace, in which case the option will look red, but you can still press start.
After selecting a camera and camera settings, a second window should open and display the camera image with green tracking points on your face. The points should move along with your face and, if the room is brightly lit, not be very noisy or shaky. If the image looks very grainy or dark, the tracking may be lost easily or shake a lot.
If you are trying to figure out an issue where your avatar begins moving strangely when you leave the view of the camera, now would be a good time to move out of the view and check what happens to the tracking points. Sometimes they lock onto some object in the background, which vaguely resembles a face.
You can also start VSeeFace and set the camera to [OpenSeeFace tracking] on the starting screen. It should receive tracking data from the run.bat and your model should move along accordingly.
Virtual camera issues
If, after installing it from the General settings, the virtual camera is still not listed as a webcam under the name VSeeFaceCamera in other programs or if it displays an odd green and yellow pattern while VSeeFace is not running, run the UninstallAll.bat inside the folder VSeeFace_Data\StreamingAssets\UnityCapture as administrator. Afterwards, run the Install.bat inside the same folder as administrator. After installing the virtual camera in this way, it may be necessary to restart other programs like Discord before they recognize the virtual camera.
If the virtual camera is listed, but only shows a black picture, make sure that VSeeFace is running and that the virtual camera is enabled in the General settings. It automatically disables itself when closing VSeeFace to reduce its performance impact, so it has to be manually re-enabled the next time it is used.
Model issues
My eyes look strange when blinking in certain expressions/My teeth clip through my jaw in certain expressions
As a quick fix, disable eye/mouth tracking in the expression settings in VSeeFace. For a better fix of the mouth issue, edit your expression in VRoid Studio to not open the mouth quite as far. You can also edit your model in Unity.
My model has blendshapes on the mesh, but they are not working
VRM models need their blendshapes to be registered as VRM blend shape clips on the VRM Blend Shape Proxy.
My model’s custom blend shape clips won’t show up in VSeeFace
There are sometimes issues with blend shapes not being exported correctly by UniVRM. Reimport your VRM into Unity and check that your blendshapes are there. Make sure your scene is not playing while you add the blend shape clips. Also, make sure to press Ctrl+S to save each time you add a blend shape clip to the blend shape avatar.
My arms/hands/thumbs are not working correctly with the leap motion and are bending in weird ways
This is usually caused by the model not being in the correct pose when being first exported to VRM. Please try posing it correctly and exporting it from the original model file again. Sometimes using the T-pose option in UniVRM is enough to fix it. Note that fixing the pose on a VRM file and reexporting that will only lead to further issues, it the pose needs to be corrected on the original model. The T pose needs to follow these specifications:
- T pose with the arms straight to the sides
- Palm faces downward, parallel to the ground
- Thumb parallel to the ground 45 degrees between x and z axis
Also make sure that all five fingers are mapped in Unity’s humanoid configuration. If the model has less fingers, please make sure to add some dummy bones for the missing fingers.
My blendshape only works in a blend shape clip, not in an animation
Using the same blendshapes in multiple blend shape clips or animations can cause issues. While in theory, reusing it in multiple blend shape clips should be fine, a blendshape that is used in both an animation and a blend shape clip will not work in the animation, because it will be overridden by the blend shape clip after being applied by the animation.
Required blendshapes
- Mouth tracking requires the blend shape clips:
A,I,U,E,O - Blink and wink tracking requires the blend shape clips:
Blink,Blink_L,Blink_R - Gaze tracking does not require blend shape clips if the model has eye bones. If it has no eye bones, the VRM standard “look” blend shapes are used.
- It’s recommended to have expression blend shape clips:
Neutral,Fun,Angry,Joy,Sorrow,Surprised - Eyebrow tracking requires two custom blend shape clips:
Brows up,Brows down - Extended audio lip sync can use additional blend shape clips as described here
- When using perfect sync, the 52 ARKit blend shape clips need to be present. While blend shape clips may be empty, all 52 blend shape clips must be present on the model.
Texture based mouth blendshapes are looking messed up
VSeeFace, by default, mixes the VRM mouth blend shape clips to achieve various mouth shapes. This can cause issues when the mouth shape is set through texture shifting with a material blendshape, as the different offsets get added together with varying weights. The following three steps can be followed to avoid this:
- Set up custom blendshape clips for all visemes (
SIL,CH,DD,FF,KK,NN,PP,RR,SS,TH) to prevent VSeeFace from trying to mixA,I,U,E,Oto emulate them. See the special blendshapes section for more information on these visemes. - Set the all mouth related VRM blend shape clips to binary in Unity.
- Disable hybrid lip sync, otherwise the camera based tracking will try to mix the blendshapes.
Lipsync issues
First, make sure you have your microphone selected on the starting screen. You can also change it in the General settings. Also make sure that the Mouth size reduction slider in the General settings is not turned up.
If you change your audio output device in Windows, the lipsync function may stop working. If this happens, it should be possible to get it working again by changing the selected microphone in the General settings or toggling the lipsync option off and on.
Lipsync and mouth animation relies on the model having VRM blendshape clips for the A, I, U, E, O mouth shapes. Jaw bones are not supported and known to cause trouble during VRM export, so it is recommended to unassign them from Unity’s humanoid avatar configuration if present.
If a stereo audio device is used for recording, please make sure that the voice data is on the left channel. If the voice is only on the right channel, it will not be detected. In this case, software like Equalizer APO or Voicemeeter can be used to respectively either copy the right channel to the left channel or provide a mono device that can be used as a mic in VSeeFace. In my experience Equalizer APO can work with less delay and is more stable, but harder to set up.
If no microphones are displayed in the list, please check the Player.log in the log folder. Look for FMOD errors. They might list some information on how to fix the issue. This thread on the Unity forums might contain helpful information. One general approach to solving this type of issue is to go to the Windows audio settings and try disabling audio devices (both input and output) one by one until it starts working.
In one case, having a microphone with a 192kHz sample rate installed on the system could make lip sync fail, even when using a different microphone. In this case setting it to 48kHz allowed lip sync to work.
Game capture in OBS is slow or not working
If you are running VSeeFace as administrator, you might also have to run OBS as administrator for the game capture to work.
If you updated VSeeFace and find that your game capture stopped working, check that the window title is set correctly in its properties. The version number of VSeeFace is part of its title bar, so after updating, you might also have to update the settings on your game capture. If you use Spout2 instead, this should not be necessary.
Recently some issues have been reported with OBS versions after 27. Downgrading to OBS 26.1.1 or similar older versions may help in this case. If you encounter issues using game captures, you can also try using the new Spout2 capture method, which will also keep menus from appearing on your capture.
It has also been reported that tools that limit the frame rates of games (e.g. Rivatuner) can cause conflicts with OBS, which then makes it unable to capture VSeeFace.
Otherwise, this is usually caused by laptops where OBS runs on the integrated graphics chip, while VSeeFace runs on a separate discrete one. Enabling the SLI/Crossfire Capture Mode option may enable it to work, but is usually slow. Further information can be found here.
Another workaround is to use the virtual camera with a fully transparent background image and an ARGB video capture source, as described above.
Settings and log file location
The VSeeFace settings are not stored within the VSeeFace folder, so you can easily delete it or overwrite it when a new version comes around. If you wish to access the settings file or any of the log files produced by VSeeFace, starting with version 1.13.32g, you can click the Show log and settings folder button at the bottom of the General settings. Otherwise, you can find them as follows:
- Copy the following location to your clipboard (Ctrl + C):
%APPDATA%\..\LocalLow\Emiliana_vt\VSeeFace - Open an Explorer window (Windows key + E)
- Press Ctrl + L or click into the location bar, so you can paste the directory name from your clipboard
- Paste it, using Ctrl + V and press enter
The settings file is called settings.ini. If you performed a factory reset, the settings before the last factory reset can be found in a file called settings.factoryreset. There are also some other files in this directory:
avatarList.ini: Starting with VSeeFace 1.13.25, this file contains the list of VRM files listed in the avatar switcher.error.txt: This contains error output from thefacetracker.exebackground process.output.txt: This contains additional output from thefacetracker.exebackground process.Player.log: This contains the Unity player log of VSeeFace.Player-prev.log: This contains the Unity player log of VSeeFace from the previous run.
Performance tuning
This section contains some suggestions on how you can improve the performance of VSeeFace.
If VSeeFace becomes laggy while the window is in the background, you can try enabling the increased priority option from the General settings, but this can impact the responsiveness of other programs running at the same time.
CPU
CPU usage is mainly caused by the separate face tracking process facetracker.exe that runs alongside VSeeFace.
The first thing to try for performance tuning should be the Recommend Settings button on the starting screen, which will run a system benchmark to adjust tracking quality and webcam frame rate automatically to a level that balances CPU usage with quality. This usually provides a reasonable starting point that you can adjust further to your needs.
One way to slightly reduce the face tracking process’s CPU usage is to turn on the synthetic gaze option in the General settings which will cause the tracking process to skip running the gaze tracking model starting with version 1.13.31.
There are two other ways to reduce the amount of CPU used by the tracker. The first and most recommended way is to reduce the webcam frame rate on the starting screen of VSeeFace. Tracking at a frame rate of 15 should still give acceptable results. VSeeFace interpolates between tracking frames, so even low frame rates like 15 or 10 frames per second might look acceptable. The webcam resolution has almost no impact on CPU usage.
The tracking rate is the TR value given in the lower right corner. Please note that the tracking rate may already be lower than the webcam framerate entered on the starting screen. This can be either caused by the webcam slowing down due to insufficient lighting or hardware limitations, or because the CPU cannot keep up with the face tracking. Lowering the webcam frame rate on the starting screen will only lower CPU usage if it is set below the current tracking rate.
The second way is to use a lower quality tracking model. The tracking models can also be selected on the starting screen of VSeeFace. Please note you might not see a change in CPU usage, even if you reduce the tracking quality, if the tracking still runs slower than the webcam’s frame rate. For this reason, it is recommended to first reduce the frame rate until you can observe a reduction in CPU usage. At that point, you can reduce the tracking quality to further reduce CPU usage.
Here is a list of the different models:
High quality: The default model with the best tracking and highest CPU utilization.Medium quality: Slightly faster and slightly worse tracking quality.Barely okay quality: Noticably faster than the first two models, but also noticably worse tracking. The worse tracking mainly results in worse eye blink and eyebrow tracking, as well as highly reduced expression detection performance. I recommend using auto blinking with this and theLow qualitymodel.Low quality: Slightly faster and noticably worse tracking quality.Toaster: This model is specifically intended for old PCs and is much faster than all the others, but it also offers noticably lower tracking quality. Eye blink and gaze tracking as well as expression detection are disabled when using this model.
Models with many meshes
Certain models with a high number of meshes in them can cause significant slowdown. Starting with 1.23.25c, there is an option in the Advanced section of the General settings called Disable updates. By turning on this option, this slowdown can be mostly prevented. However, while this option is enabled, parts of the avatar may disappear when looked at from certain angles. Only enable it when necessary.
In some cases it has been found that enabling this option and disabling it again mostly eliminates the slowdown as well, so give that a try if you encounter this issue. This should prevent any issues with disappearing avatar parts. However, in this case, enabling and disabling the checkbox has to be done each time after loading the model.
GPU
GPU usage is mainly dictated by frame rate and anti-aliasing. These options can be found in the General settings.
If you find GPU usage is too high, first ensure that you do not have anti-aliasing set to Really nice, because it can cause very heavy CPU load. Next, make sure that all effects in the effect settings are disabled. If it is still too high, make sure to disable the virtual camera and improved anti-aliasing. Finally, you can try reducing the regular anti-aliasing setting or reducing the framerate cap from 60 to something lower like 30 or 24.
Generally, rendering a single character should not be very hard on the GPU, but model optimization may still make a difference. You can use this cube model to test how much of your GPU utilization is related to the model. A model exported straight from VRoid with the hair meshes combined will probably still have a separate material for each strand of hair. Combined with the multiple passes of the MToon shader, this can easily lead to a few hundred draw calls, which are somewhat expensive. Merging materials and atlassing textures in Blender, then converting the model back to VRM in Unity can easily reduce the number of draw calls from a few hundred to around ten.
Some people with Nvidia GPUs who reported strange spikes in GPU load found that the issue went away after setting Prefer max performance in the Nvidia power management settings and setting Texture Filtering - Quality to High performance in the Nvidia settings.
Donations
A surprising number of people have asked if it’s possible to support the development of VSeeFace, so I figured I’d add this section.
Deat
If you appreciate Deat’s contributions to VSeeFace, his amazing Tracking World or just him being him overall, you can buy him a Ko-fi or subscribe to his Twitch channel.
Emiliana
I don’t really accept monetary donations, but getting fanart, you can find a reference here, makes me really, really happy.
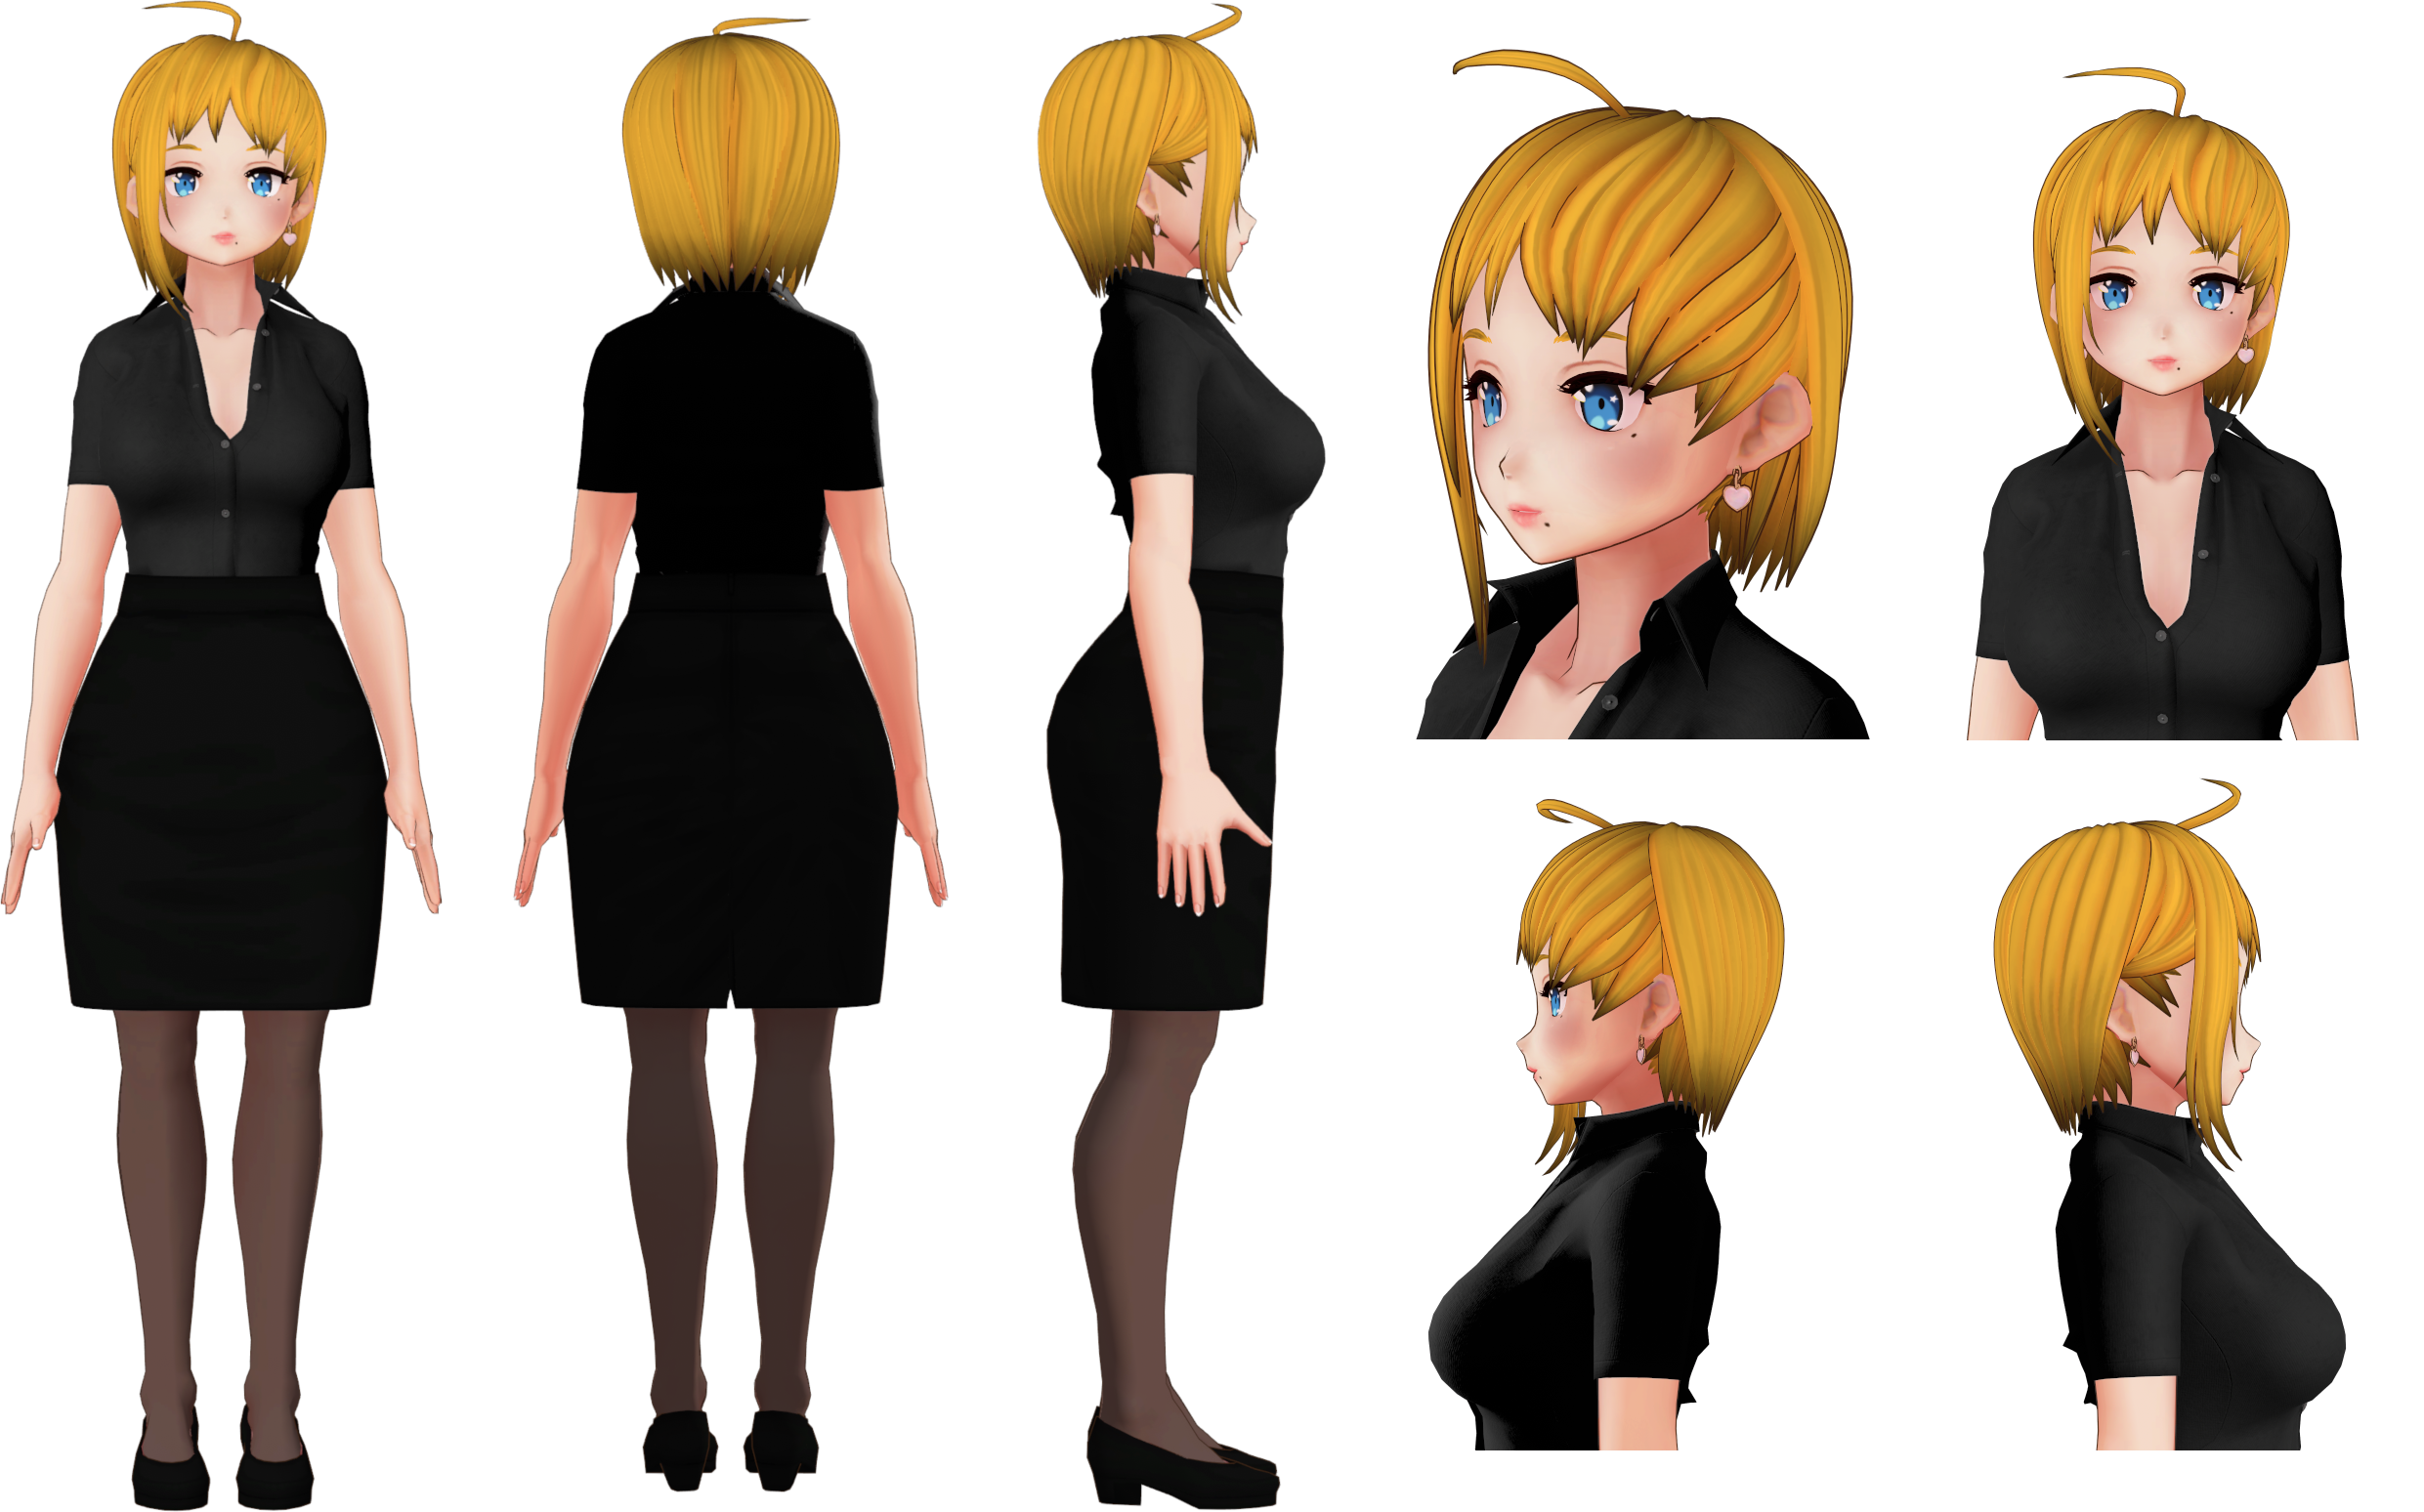
You really don’t have to at all, but if you really, really insist and happen to have Monero (XMR), you can send something to: 8AWmb7CTB6sMhvW4FVq6zh1yo7LeJdtGmR7tyofkcHYhPstQGaKEDpv1W2u1wokFGr7Q9RtbWXBmJZh7gAy6ouDDVqDev2t